
Welcome to Winter 2020

I was hoping that we could hold off on the cold, blowy white stuff for a while, but . . . Mother Nature, as is her wont, had other ideas. So, yesterday’s home inspection had 4” of snow on the roof. Snow covered roofs introduce all kinds of spectacular opportunities for inspectors to land in the rhododendrons just before they get carted off to the emergency room. Inspectors are NOT required to traverse a roof if, in their opinion, it is unsafe to do so. Mind you, some inspectors think that getting on any roof is dangerous so they never, ever do such a thing. I had a lawyer (I do expert testimony as a home inspector in cases where there has been a major dereliction on the part of the inspector) who I explained this to as he questioned the inspector not traversing. Yes, I explained, it is a cop-out but inspector gets the final word on safety.
This all came to mind because I had an agent recently tell me that winter is rough when you can’t do any inspection on the roof. I gave a little chuckle - there’s always a way to get a job done. It might not be perfect like we’d have on a pretty spring day, but usually we can get pretty good information - and find some surprising things that otherwise get missed. After 15 years in the business, I have a few tricks up my sleeve on how to get on and off a roof safely even with snow. (I also have stories about pushing my margin of safety to the point of thinking “This was dumb!” )
Real-Life Examples of What Can Be Missed on a Home Inspection in Winter
Case in point, yesterday. The chimney could not be seen from ground level because trees and the ground slope angle blocked the view. If I didn’t get on the roof, I would have missed this::

Chimneys are not supposed to come apart at the seams. This one was, it was leaking into the attic, and the crown needs to be replaced. In all, there is at least $2,000.00 worth of work to bring this chimney back to satisfactory condition.

This picture is another, less dramatic example of an easy miss, especially if the inspector does not traverse the attic. Hint, if the inspector does not like walking roofs, it is unlikely that he feels any more comfortable walking attics.
As I said, there’s always a way - IF the inspector wants to fully complete his inspection and protect his client.

Ice Damming In Pullman
After skating for most of the season, Old Man Winter showed up with a shovel and has proceeded to bury us. So far, several areas have reported record snow falls including my home town of Asotin. For those of you that scoffed when my sweetie bought me a snow-blower, HAH! The Snow Joe has earned its keep this month.

The view from the roof at an inspection in Pullman.
Also happening this month - business is picking up. This time of year gets pretty treacherous for walking roofs, though sometimes it can be done. It requires a careful consideration of the underlying structure of the snow and of the point of access, but snow by itself is not a primary limiting factor.
What is a primary limiting factor is ice. And, by golly, we are seeing a lot of ice on the edges of roofs lately due to ice damming.
What Is Ice Damming?
In its simplest form, ice damming is a build up of ice on the eave of a roof. The formation is from snow melting at a higher point on the roof, typically over the heated portions of the home, and flowing down the roof slope to the eave. The eave is at nearly the same temperature as the air outside. As the water hits this frigid zone, it re-freezes.
In the process, the dam blocks more water from flowing freely off the roof deck, thus extending the ice dam. Because the velocity of water drainage plays a part in the process of re-freezing, lower slope roofs are more susceptible to ice damming.
On a low enough slope, the ice can build up many feet along the roof deck. That is what I found with the roof in the second picture. My best estimate is that the ice extended 8-10 feet up the roof from the edge.

Damaged Caused By Ice Damming
The presence of the ice is not the major cause of damage to the home. While the accumulation can cause problems, it is the water behind the dam that causes the most concern. Our roofs are not designed to act as pools and are not water-proof. They are water shedding. That is a huge difference. Obstructed water will not drain down the roof. Water being water, it will try to find a way to flow with gravity. This means flowing under the shingles, finding gaps in the underlayment, and getting into the ceilings and walls of the home.
It is not just a matter of getting a roof stain on your ceiling, though. This moisture in your attic can be a major contributor to the growth of mold and wood destroying fungus.
How To Recognize an Ice Dam

Ever drive by a house and admire the long glittering icicles hanging from the roof? Well, admire those from a distance. If you see those on your house, you likely have an ice damming issue.
Likewise, if there is a four inch iceberg on the edge of your roof, you’ve got a problem.
Also, a couple people a year get killed by falling ice or icicles from a roof.Do not walk right under the icy spears admiring them. If you are walking around a house with ice on the roof, stay near the wall under the eave or well clear of the fall zone to the perimeter.
Just a heads-up - if there is ice at the edge like this, I’m not getting on the roof.
How To Fix Ice Damming
The first thing to do is figure out where the heat is coming from to allow for the excessive snow melt. Usually, the first and best answer is that you do not have nearly enough insulation in your attic. You don’t even need to go into your attic to figure this out - if your roof is the first in the neighborhood to lose snow cover, you probably need more insulation. (I take perverse pride in having snow on my 1910 built home long after everyone else has exposed their shingles.. It a great sign that I did a solid job of insulating the home. Lower energy bills are nice, too.)
There are other factors that come into play. If you have canned ceiling lights, they can create enough heat to cause problems. Have a contractor insulate the boxes.
Check to make sure that you have enough effective attic ventilation. If you do not, the attic will retain warm air and lead to ice damming. Also, to mold growth.
If you have a furnace in the attic, make sure all the joints in your duct work are tight. Leaky ducts will cost you in more than dollars.
Insulate all your ventilation fan ducts. Bathroom fans and dryers move warm air to the outside. If they pass through the attic on the way, they will transfer much of their heat to the attic space. Insulate them and limit that possibility.
If these steps do not work to control your issue, it is time to call in a quality contractor to perform a thorough analysis of the heat transfer taking place, including thermal transfer through air exfiltration from ceiling penetrations or up the wall cavities.
Good luck! As always, if you have questions, feel free to call. I may have a tidbit of information that can help.
I’ll leave you with one more scary picture . . .

Water is actively leaking and two different fungi are growing.

Roof Design Flaws, Pt. 1
If your inspector never climbs the roof, he's going to miss potentially important flaws that stem from the design of the roof, not just from poor construction practices or sloppy maintenance. Watch the video for an example!

7 Tips for Maintaining a Metal Roof
Maintaining a metal roof does not require world-class contractor skills. In fact, in most cases, it just needs a little common sense and careful attention to safety. The following tips apply to most metal roofs, whether exposed fastener, standing seam, or architecturally inspired types that look like slate, cedar shakes, or ceramic tile.
Tip #1 – Avoid Walking on the Roof
Metal roofs are thinner than other roofing materials and prone to getting bent or even punctured when you walk or stand on them. Not only that, but foot traffic can cause low spots and water ponding on near eave and at panel endlaps which will encourage leakage.
Also, each one of those dings and dents, even minor ones add up and alter the beauty of the roof.
So, if someone must walk on the roof (such as yourself, inspectors, service providers, etc.) make sure they know to walk on the flat part of the panels for exposed fastener and standing seam systems, using the joists or purlins for support. The fancier architectural styles of metal roofing will need to be evaluated on a case-by-case basis.
Now for a safety warming. Metal roofs, every one of them, are dangerous. The metal is slick under dry conditions. When wet, frosted, icy, or snow-covered, trying to walk them is likely to be followed by a trip to the emergency room. The general rule of thumb is to stay off it entirely, if possible.
Tip #2 – Limit Debris Build-up
This advice is the same for every roof. Don’t let debris build-up, either on the surfaces or the valleys. Not only does it affect the immediate appearance of your roof, but the breakdown of the materials can stain the roof or under some conditions, actually damage the metal. Also, organic matter retains water. We want the water to leave as quickly as possible to avoid encouraging leaks.
To clean the debris, you can use a blower, a stiff broom, or water. In any case, work top to bottom. I recommend temporarily covering the gutters so you don’t have to spend extra time cleaning them more than once.
Tip #3- Clean the Gutters
What do the gutters have to do with your roof? Well, if they don’t drain properly, they back up and can damage your fascia system. Worse, in winter, the ice from the gutter will form and, glacier-like, try to invade the spaces under the metal. If you have mature trees, clean those gutters annually (at least.)
Tip #4 – Do Not Let Dissimilar Metals Contact the Metal Roof
Certain metals, when they come in contact with each other, react through a process called electrolysis. If you’ve ever seen ‘green corrosion’ on your copper plumbing, that is an example and almost always piping that was attached to galvanized steel without a dialectic washer.
The same thing can happen with your metal roofing. The installer should have made sure when he put the roof on that there were no other metals that would react. Still, be aware of the possibility. If you have a satellite installer coming, or another service person who will be making an addition on the roof, make sure they understand that they need to use compatible materials.
After a big wind-storm or other severe weather event, make sure that all the roofing materials are still in position. A chimney spark-arrester blown off might cause you additional aggravation if not detected.
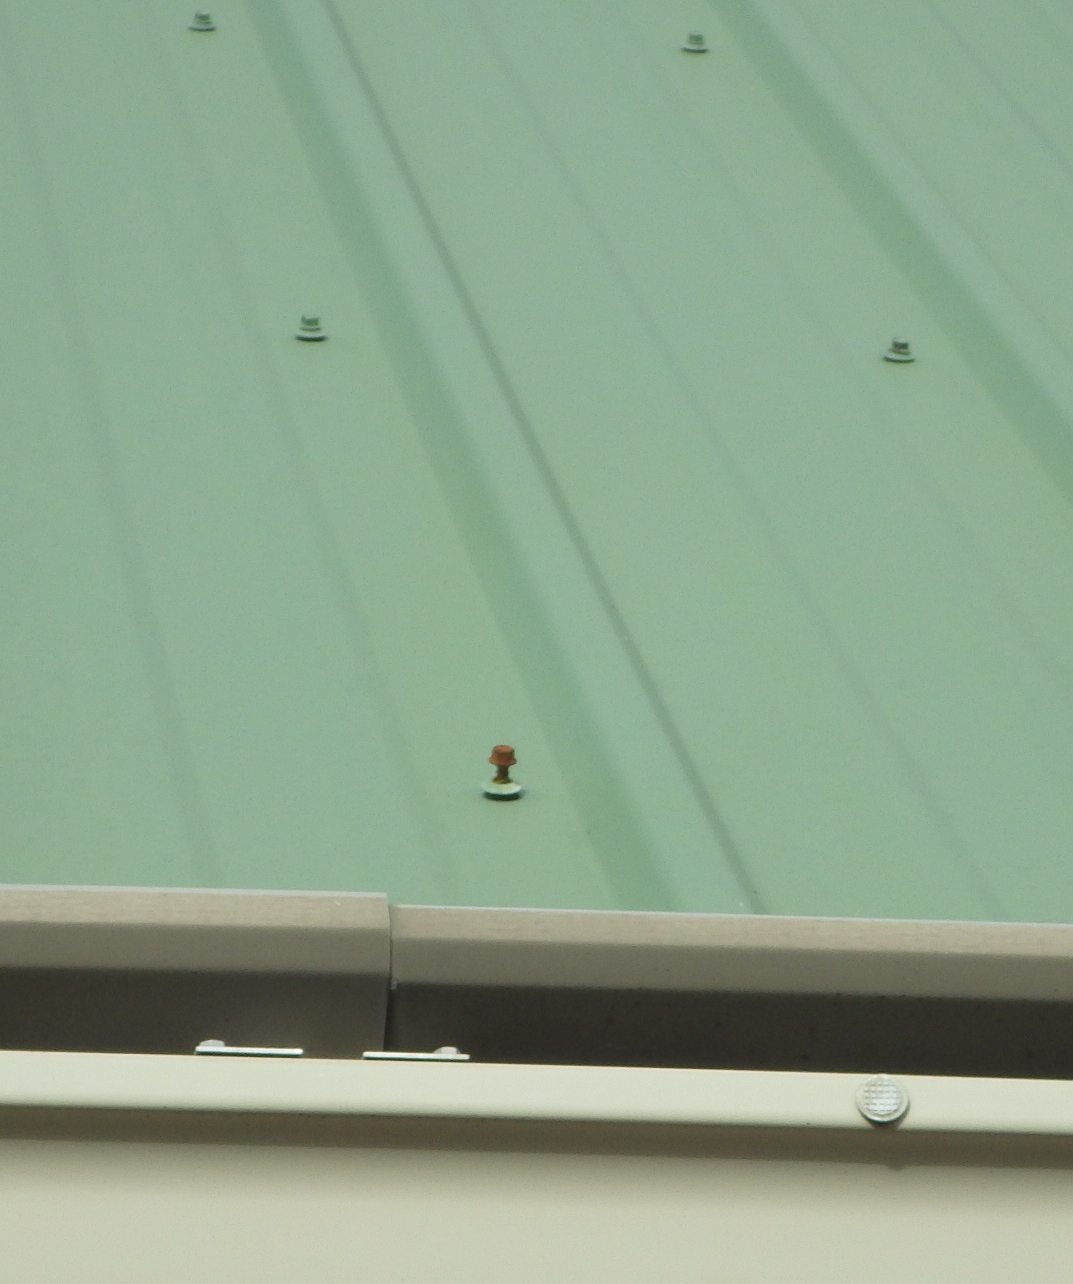
Tip #5-Check for Loose Fasteners
There are two techniques for securing the roof metal to the framing of the house. The first, and most common, is to use exposed fasteners. Nowadays, these are screws with neoprene washers to protect against water intrusion. In the old days, it was nails.
Over time, fasteners tend to loosen, especially at the edges. This allows the wind to get under the metal and can lead to significant damage. Semi-annually, check your roof for loose fasteners. The safest way is to stand at ground level at a point that lets you look up the roof on the same angle as the slope. Fasteners that are protruding are relatively easy to see because they stick up past the roof. Binoculars can help. Any loose fasteners should be replaced.
Tip #6 – Check Your Sealants and Boots
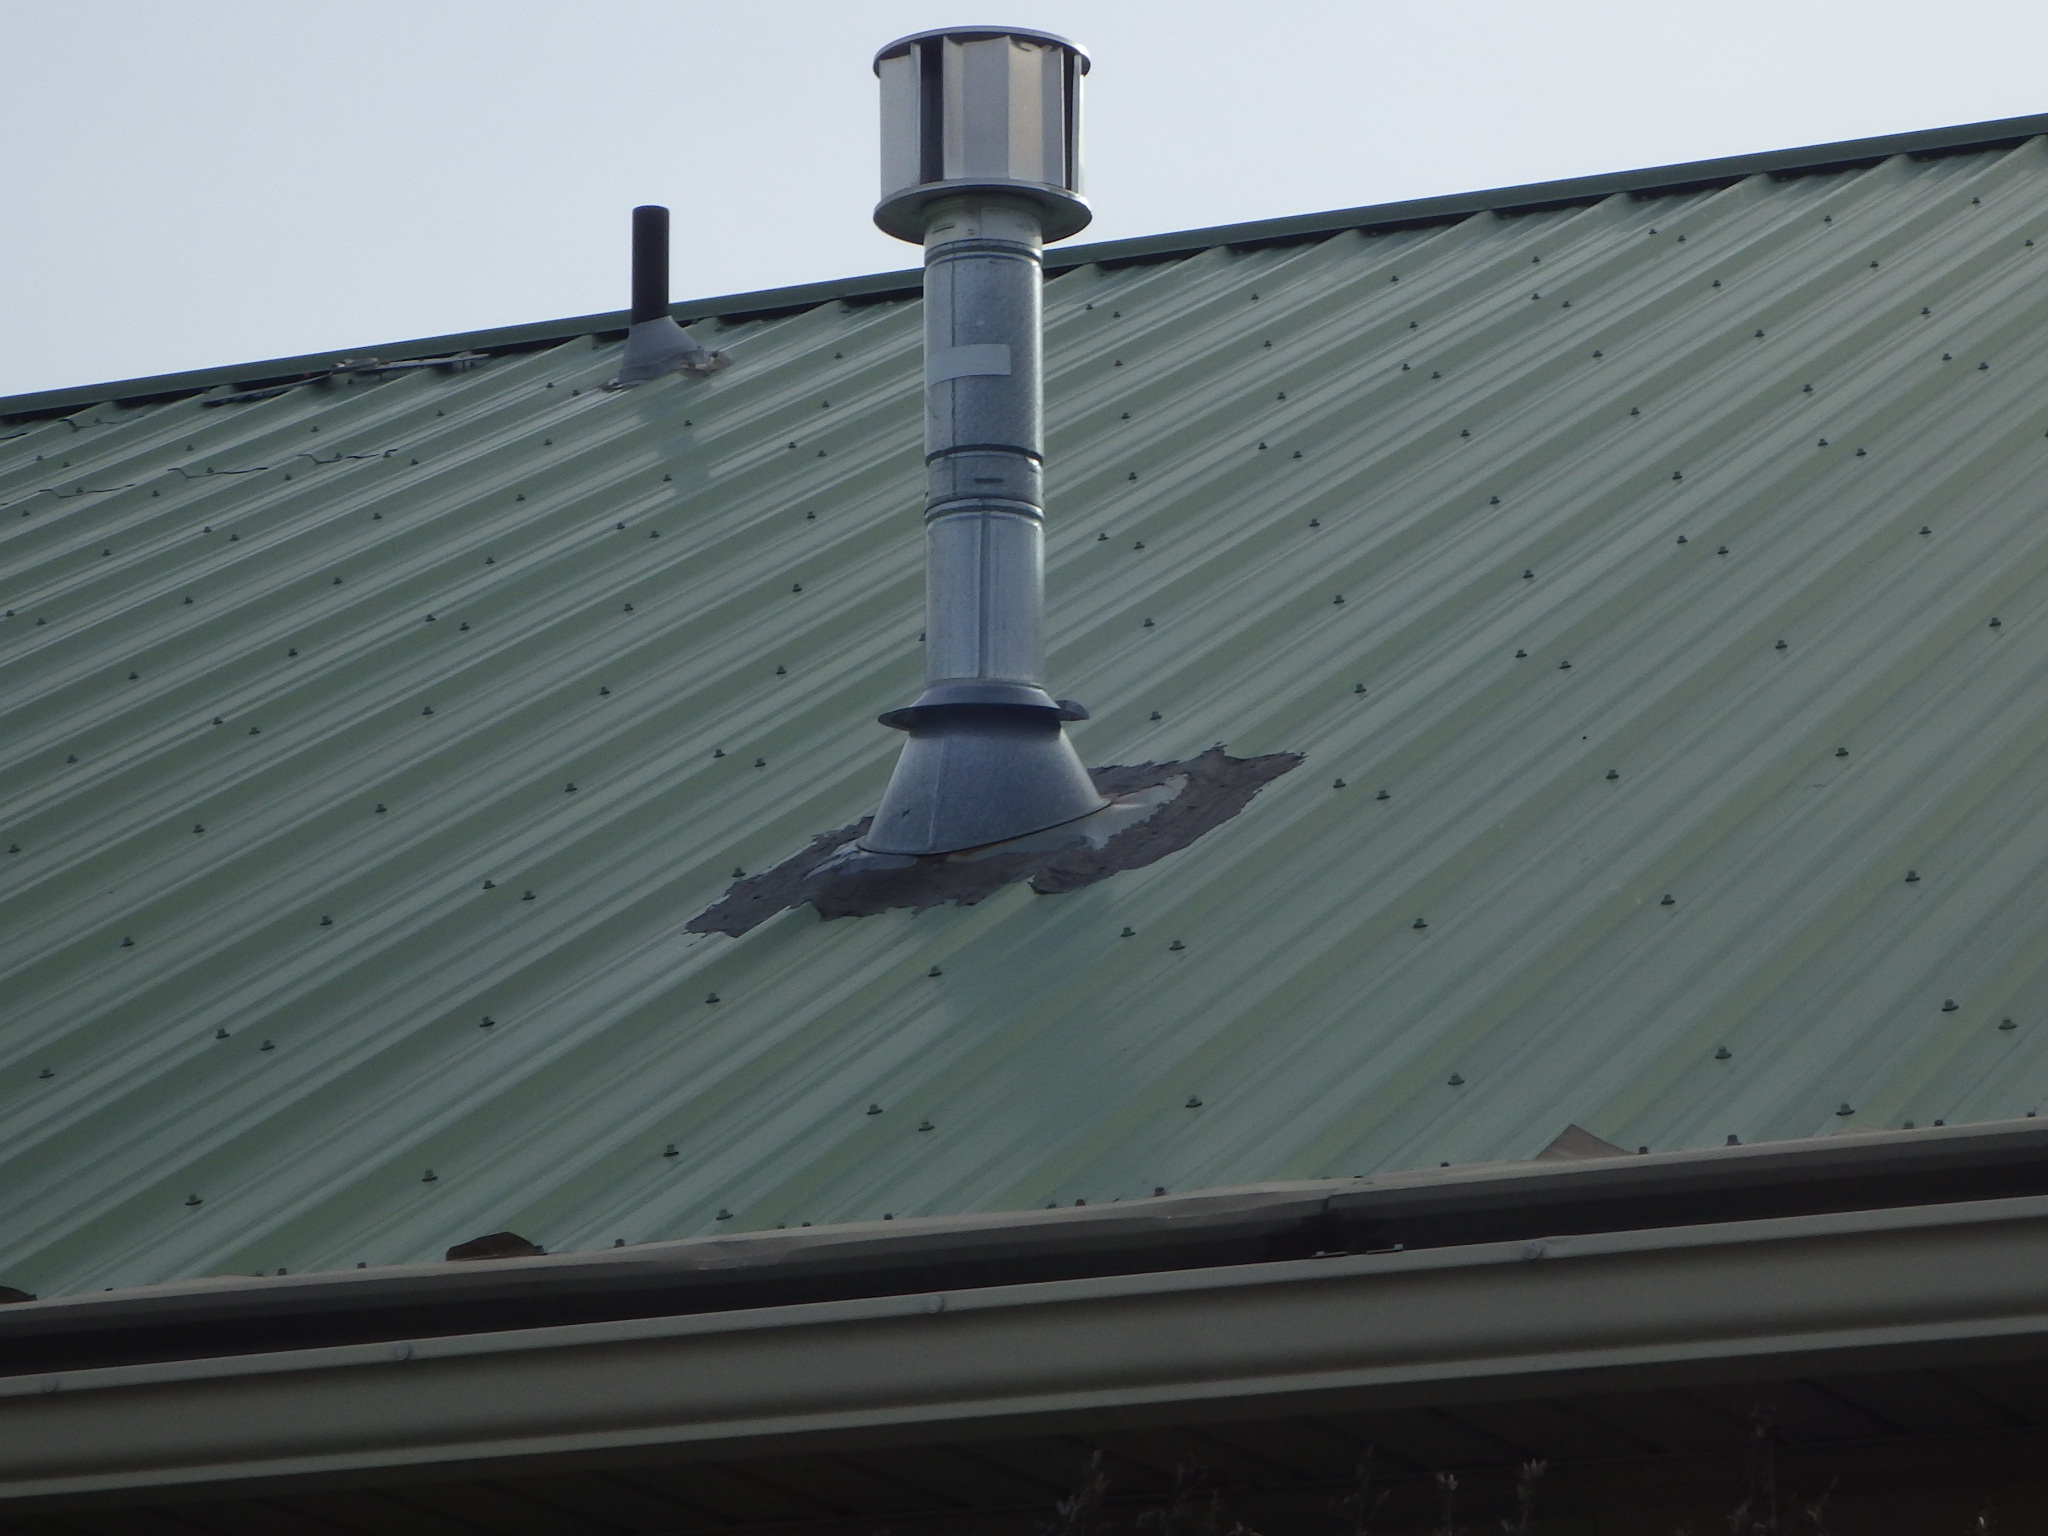
Whoever installed the gas-fired fireplace did NOT understand metal roofing.
Weather exposure degrades silicon sealants and the boots used for plumbing vents. Annually check these for routine wear. Pay particular attention at chimneys, skylights, and valleys – all are prime candidates for leakage. Replace or re-seal as needed. If you are in doubt, call in a roofer with experience with metal. This is one where it is always better safe than sorry.
Also, a very common issue in this area is a person installing the roof without understanding how to do so properly. Your inspection should identify these for repair, but if left in place, pay strict attention to the deficiencies.
Tip #7 – Snow Removal
Just as we don’t let the organic debris from trees stay on the roof, I encourage you to remove ice and snow – when safe! - if it begins to pile up to depths sufficient to damage the framing. Another reason to remove the snow is that metal roofs shed it in avalanche-type clearances. You do not want to be under that when it happens. Make sure to use a snow rake that is safe for metal - you don't want to scratch the surface and create rust.
In areas with harder winters, snow guards may be attached. These capture the snow before it can slide off and provide a holding field to allow the frozen precipitation to melt and drain more safely. I recommend them if you have doorways where snow or ice is likely to discharge unexpectedly.
Now for some guidelines. Realistically, these apply to every roof.
First, inspect your roof on a regularly scheduled basis. I recommend twice a year, spring and fall.
Second, do a precautionary inspection if one of the following conditions occur: after high winds, inspect for loose or missing flashing or trim, damage from falling limbs, and accumulation of and/or damage from other windblown debris; after a hail storm (unlikely here but . . .) check for penetration of the surface coating, damaged sheet-metal trim and flashing and loose fasteners; after an ice or snow storm check gutters, trim and flashing for damage from moving ice or heavy accumulations. Inspect snow guards if present to make they are intact.

Washington State License #215
Former SBCC Member, Former Chairman State Home Inspector Advisory Licensing Board.