

Isn't the Water Supposed to Drain AWAY from the House?
The crawlspace vents are lower than the surrounding soil. It's a fairly common occurrence and easy to fix.
More often than not, your builder is not to blame - it is the landscaper who is beautifying the home without the awareness of the rest of the home systems.

360° Pictures are Here!
Want to show your parents, your kids, your friends your new home but finding the photo options limited?
Safe@Home has a solution for you! We've invested in new software and cameras that will allow us to put 360° pictures into your report. We're excited about this new feature and are offering it without any additional charge! All you have to do is ask!

Roof Design Flaws, Pt. 1
If your inspector never climbs the roof, he's going to miss potentially important flaws that stem from the design of the roof, not just from poor construction practices or sloppy maintenance. Watch the video for an example!

When Should the Inspector Walk the Roof?
Here is a short video that I did back when things were a little cooler than today. (Today, it hit 111 degrees in Clarkston! Yikes!)
With a little luck, I'll get more of these out on a weekly basis.

Building a Solar Collector
Things get slow over the winter season for me and, as they say, idle hands do the devil's work. In this case, they built a solar collector for my garage.
The project did not require any fancy materials and the basic plans were available on the internet (though I tweaked them considerably.) All told, the project took a couple of days. For someone handy, it would have been a single day project, but my fine carpentry skills start and stop at the "Honey, where's my sledge hammer?" stage.
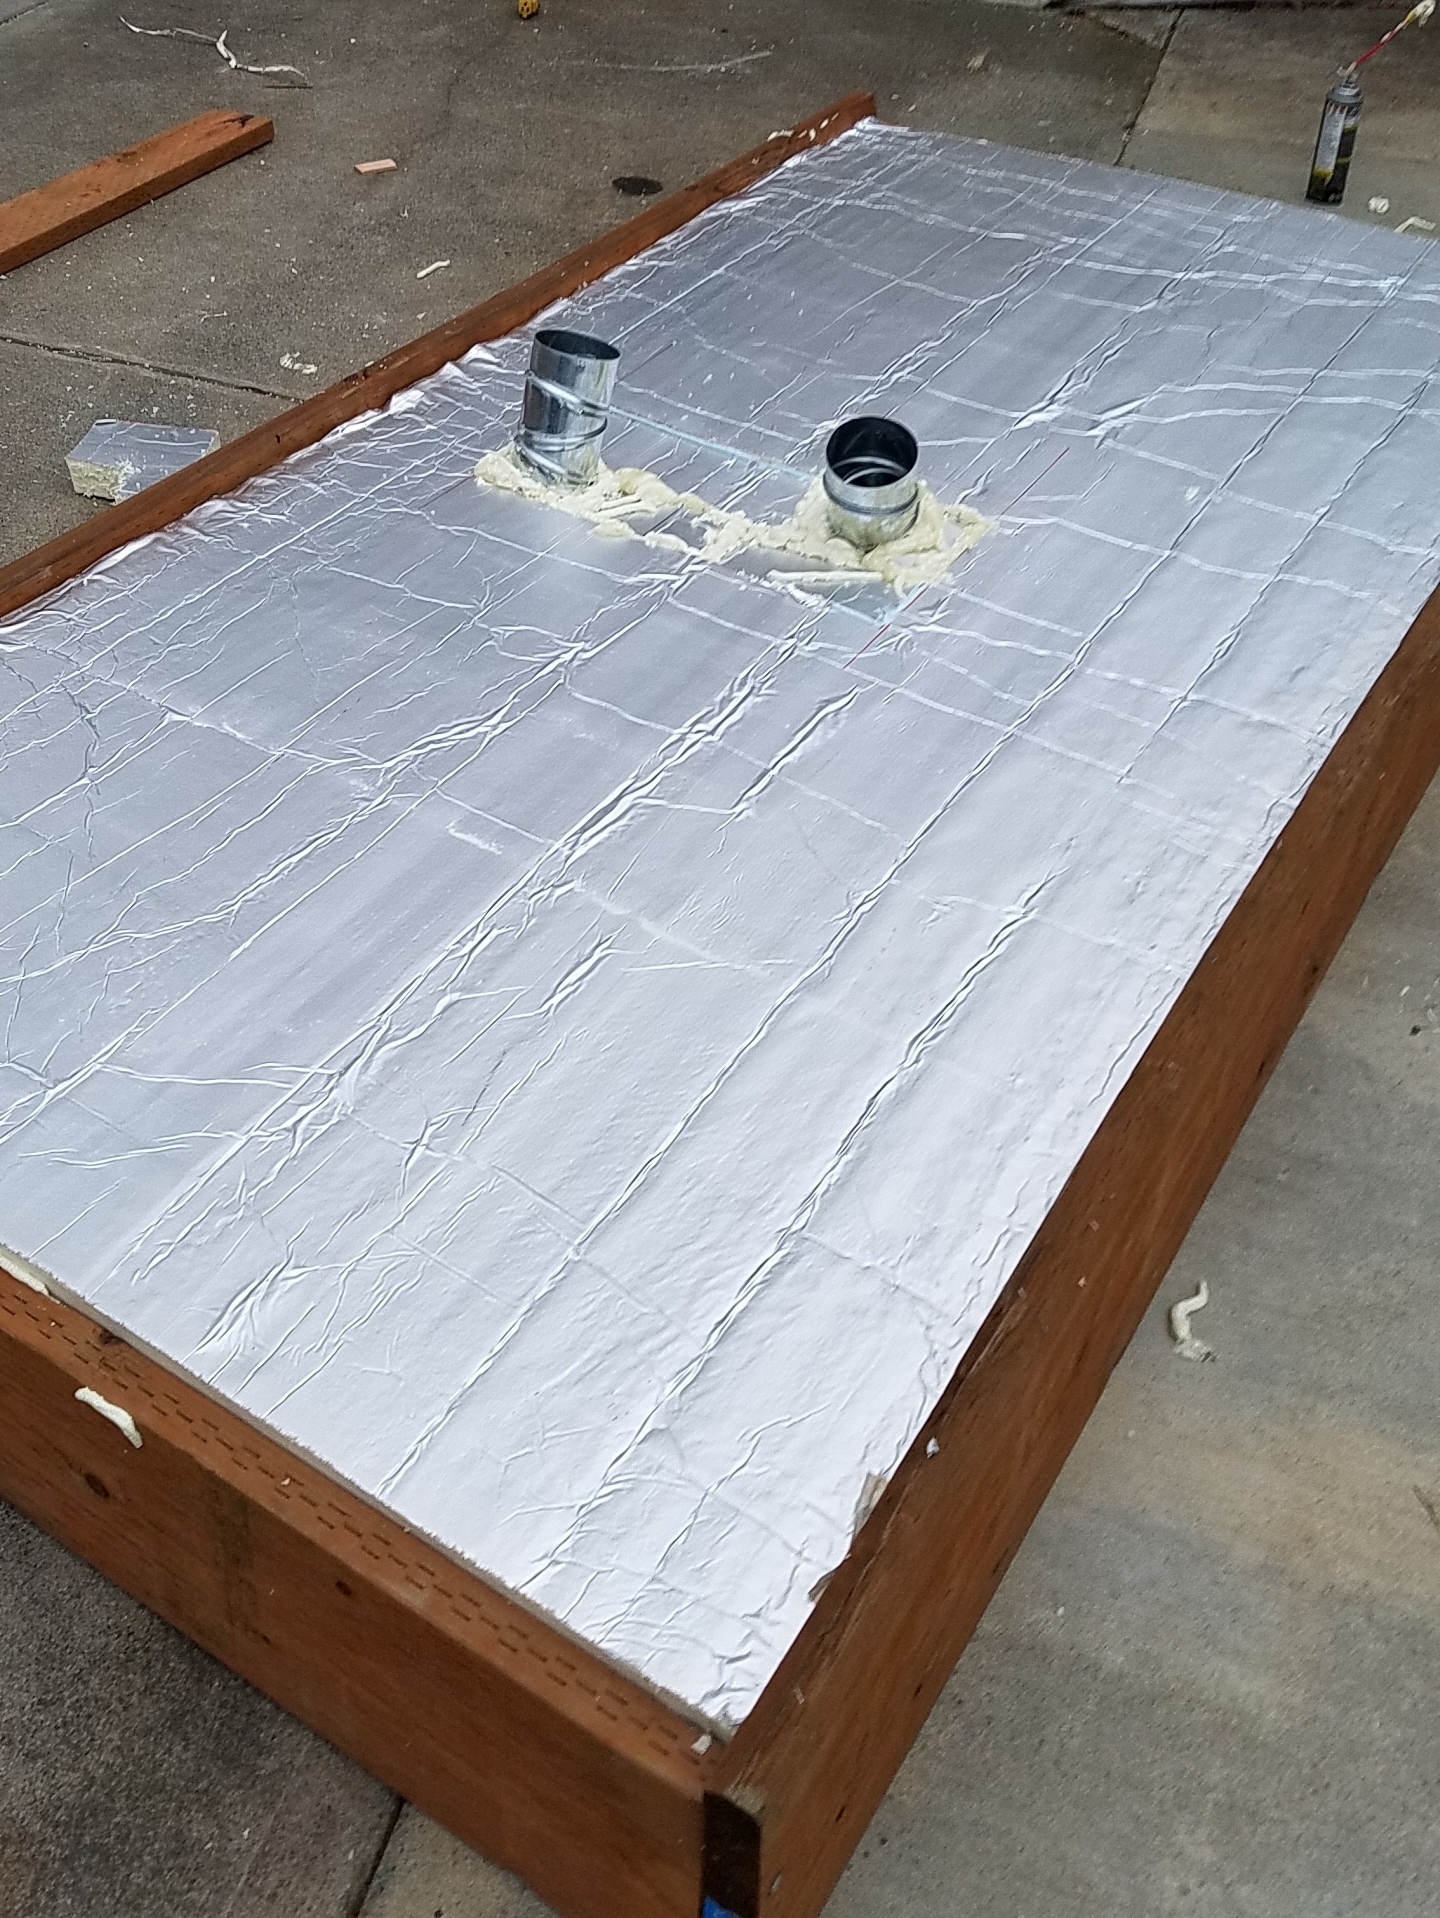
Building the Collector

My first step, after gathering supplies, was to build the collector itself. Since I can’t follow a simple recipe, this is where I began deviating from the plans. The colector sits inside the frame and absorbs the solar energy. I intended to use a small duct fan to boost air flow, so instead of designing the system to flow up the screen using natural convection, I made it a down-draft panel with the cold air coming in at the top and the fan sucking the warm air from the bottom.
Then I made three more changes. The original plans called for two layers of mesh. I went with five. I also changed the material from the plastic mesh to black aluminum screeen. (In hindgsight, I think the black plastic mesh would work just as well.) The final change in the collector was to add black plastic to each layer in a staggered pattern so that the air is always in contact with a solid, warm surface.
To anchor all the mesh, I used a frame of 1x2 lumber and mounted each layer on lathe strips (because they are skinny and cheap.)
Building the Box Frame
This is where my general lack of handiness asserted itself. This was combined with at least one moment of total nit-wittery. We’ll get to that shortly.
I spent a bit more money to buy pressure treated 2x12 lumber for the exterior frame. It can be done with less expensive materials, but I paid the additional cost in the dual expectation that the collector would work (there were doubts among friends, family, and the neighbors) and that it would last the next 20 years.
I cut the wood to fit with the bottom edge of the supporting side beveled to improve my angle to the sun. Then I inserted the top and bottom planks and proved to myself that I can be an idiot.
I built the collector to be four feet by eight feet. When I inserted the top and bottom, they were slightly larger than four feet so I could get the collector in without busting it apart. So far, no problem. I bolted everything together, easy as pie. Then I tried to drop the collector in – and discovered my little math error. The collector wouldn’t fit by 1.5 inches. When I measured for the longer axis, I neglected to account for the thickness of the bottom board.
Crud. Given no choice but to undue my work, I did. Re-measured (carefully this time!) and put everything back together. This time, the interior collector fit, if a bit snugger than I intended.
Insulate, Seal, And Ductwork
The next phase was to insulate the box with foam and caulk seal all the joints. Pro-tip for homeowners – if you want to save money on heating and cooling, don’t by a fancier furnace or expensive windows. Insulate and air seal – you’ll get your money back in a year or two.
Once the insulation was in and I got caulk smeared everywhere, I added the ductwork using inexpensive dryer ducting. I insulated that, too. Flipping it over, I caulked the plexiglass to the front of the frame and the collector was ready to move to the south side of the garage.
Remember the bevel cut at the bottom? The second purpose for that was to add stability to the whole frame so I wouldn’t need to screw it to my wall. The frame is heavy enough that wind will not bother it.
The ductwork extended past the back of the box enough to enter in a window. Just as I didn’t want a dozen screw holes in my siding, I didn’t want to cut holes into it, either. So, the window. I framed out ducts with more insulation, sealed with expansion foam and used the window to lock things down tight across the top the same way you would with a window air conditioner.
On the inside of my unheated garage, I ran a 20 foot length of dryer duct and added the fan. The discharge point is right over the laundry machines. The fan is on a timer.
So Does It Work?

Better than expected, actually. The heat on a sunny day coming from the collector exits at better than 100 degrees. Remember that this piece of ducting is 20 feet long, so there is considerable temperature loss along the length of it. When I measured the immediate discharge piping with my infrared camera, the temperature was over 140 degrees. Very pleasing!
On really cloudy, rainy days, it works, but not as effectively. The heat output is usually between six and ten degrees above the input temperature, so it is still heating.
During an average winter, the garage gets down to freezing and stays there. This year, it has gotten as warm as a balmy 63 degrees.
All in all, a fun project that will also save me money in the long run, and it’s kind to Mother Nature. I think I’ll build another one next year for my office.

On a New House? Never! - er, Almost Never
Every municipality has what are known as design criteria for their region. These criteria include things like wind speeds, snow loads, what kind of seismic activity can be anticipated, and that sort of really useful data.
One of these criteria is the frost depth. Also known as the frost line or freezing depth, it is the point in the soil where groundwater can reasonably be expected to freeze.
This is important to the home builder because the foundation can be damaged by frost heaves. These occur when the water freezes into ice crystals. Remember that water expands when it freezes? It is that same basic fact with the added concern that it is applying force to the foundation and can crack a foundation wall.
Older homes in our area often do not have sufficient depth on the foundations. Short of major excavation and rebuilding of the foundation, this is not correctable.
On newer houses, it should never be an issue - until it is. I ran into that recently in a house that was built after 2000. I popped the hatch, saw this -

- and ran for my tape measure. By measuring the distance from the base of a window to the bottom of the foundation wall, both inside and out, I determined that the depth was 27 inches.
Design criteria for Whitman County is 32 inches.
Houston, we have ourselves a problem. Add in the fact that the home was two stories tall over this, and the problem compounds.
My recommendation to my client was to seek professional engineering. Not good news for them, I know, but better to know these things on the way in than six years from now.

Things that Inspectors Find
Old houses are always a treat for inspectors since they've had plenty of time to accumulate oddities. In this case, I manage to squeeze into a tiny crawlspace and wormed my way around underneath this house in Eastern Washington.
I did not expect to find an entire tree stump under there. I took some video because it was fun but I have to apologize - the lighting conditions were not really terrific.
For those of you curious, yes, it is mandatory for the inspectors to enter crawlspaces if it is accessible and safe. Obviously, accessible is a relative term. I get into a lot of spaces that others simply can't because I'm a touch on the skinny side.
Angie's List Super Service Award Winner
If you look to the right-hand side of the front page, you will notice that I have a new award. In my first year with Angie's List, Safe@Home Inspections won their prized Super Service Award for 2017.
These are the sorts of things that happen by accident. It requires an enormous investment in giving my clients an outstanding inspection along with great service before and after the inspection.
Personally, I'm incredibly pleased. I'm also looking for ways to do even better this year.
My thanks to all the clients and their agents that placed their trust in me!

Why the Siding on Your Brand New Home Doesn't Have a Warranty
Let’s chat about siding. Specifically, siding on new homes. New homes should be the easiest to inspect since they’re built to the newest codes by licensed contractors and tradesmen. {insert eye-roll here}
Most of the new homes in our region are built with either a cement fiber-board such as Hardie Plank or a wood-resin composite such as LP’s SmartSide materials. Just to be clear from the top, these are both quality products and nothing I have to say that follows is a slam against them.
No, my complaint is that these sidings are all to often compromised during the installation process. This won’t be readily apparent for a decade or two, but I do expect that we’ll see a wave a failures. Complaints to the companies are going to leave a lot of consumers unhappy because the consensus opinion will be that the warranty was voided at the time of installation.
Why is My Warranty Voided?
Speaking bluntly, your warranty for the siding is likely voided because the contractor couldn’t be bothered to read the installation instructions provided by the manufacturers. It’s not as though the specifications are unduly complicated or long. The James Hardie instructions run four pages. The LP SmartSide runs five. Both have plenty of pictures for the literacy-challenged.
Top Four Ways Your Siding Gets Installed Wrong
A Failure to Adequately Flash Openings and Band Boards
The single most consistent failure is to not install the flashing the windows, doors, and band boards. Each of these have a horizontal surface that can accumulate water which can lead to leaks or degradation of the trim pieces (and then leakage.)
There should be a piece of metal flashing installed in these locations. This flashing is commonly called head flashing or Z-flashing. It is installed under the top piece of siding, extends over the vulnerable horizontal surface, and finishes with a downward leg to clear the water from the trim. In the first picture, if you look closely you can see the flashing (it is painted the same color as the siding) over the horizontal trim at the front porch. In the second, the flashing is plainly missing.

Flashing installed over the band-board correctly

Flashing missing over this window trim
Not only is this flashing required by most, if not all, manufacturers, there is even a code reference. This flashing has been in the International Residential Code since 2009 (R703.8 Flashing).
A Failure to Leave Proper Clearances
There are a variety of clearances to consider when installing siding. Clearance refers to the gap we leave from the siding to another material. For example, by code we leave six inches between the bottom-most edge of the siding and soil. By specification, we are supposed to leave two inches between Hardie Plank and the roof deck. SmartSide only requires one inch in this location. This is a consistent difference between the two materials. Your inspector should be able to recognize the difference between them and apply the correct specification.
That said, good luck in getting most contractors to actually follow the guidelines.

Damage evident at the base of the wall due to water contact.

Brand new and prepped for failure. Poor clearance to the deck and soil.
A Failure to Install the Water-Resistive Barrier
“ . . . felt or other approved water-resistive barrier shall be applied over studs or sheathing of all exterior walls.” That is a direct quote from the IRC. It does not differentiate between the top of walls on gable ends or the garage against those at living spaces. So why do I see this on local job sites?

Seen recently on a job site nearby.
A Failure To Add Kick-out Flashing
Kick-out flashing is supposed to be installed at the intersection of a roof and a vertical wall. This piece of flashing is angled so that water running down the roof deck is directed away from the wall and into a gutter. If the water is allowed to flow unimpeded against the siding, there will be damage. The only question will be one of degree.

Mr. Fix-it has a wealth of great information at his website! http://misterfix-it.com/
So there we go. Four reasons to keep a sharp eye on your siding contractor. Just an FYI, this doesn't just apply to new homes. I've seen the same types of failures on older homes that were re-sided.
Three Questions to Ask Your Home Inspector - The Answers May Surprise You!
You can find a dozen sources for questions to ask your home inspector. Let me add a trio that most lists won't have.
Do You Have Relatives Worrking in Real Estate?
The answer may well be yes. Our region has a surprising number of inspectors who have close relatives working as Realtors or other related industries. In an ideal world, this would be disclosed whenever a conflict may present itself. In the real world, things are more gray. Ask. If the spouse or siblings aren't involved in any way, great. If so, you know and can make your own judgment.
Do You Perform Repairs for Concerns You Find?
Most inspectors will answer 'No.' Most, but not all. While I was still on the Home Inspector Advisory Board, I had an inspector call to complain about precisely this conflict in the Tri-cities area. From the rumor mill, it's happening in just about every region despite the fact that the Washington standard prohibits work-for-hire for one year post-inspection.
Your inspector should not have a financial interest in finding concerns. The inspector's job is to observe and report, accurately. That's it.
Does Your Inspector Follow One Standard?
This seems like an odd-ball question since inspectors obviously follow a standard. The complication comes in with the fact that most inspectors in this area work both sides of the state lline. Washington State has a very well-developed Standard of Practice. The problem comes on the other side of the line. Idaho has no requirements, so some inspectors use a different standard there.
I recently saw a seller blind-sided because his inspector two years ago failed to identity a potentially hazardous electrical panel. Why? Because it was not require in Idaho though is was in Washington. He knew the panel had a lousy reputation and failed to inform his client.
Your inspector should use one standard, the most restrictive. Here, that's the Washington SOP.
So there you go. Three extra questions to ask. It's okay to spend time on the phone with an inspector getting a feel for them and the way they do their job. Take you time, ask lots of questions, and good luck with the inspection.

A Question to Ask Your Inspector
Search the internet and you can find a raft of questions to ask a home inspector. Many will have a variety of questions, usually involving cost, expertise, experience, and availability. Quite a few have a question along the lines of “Do you participate in continuing education programs?”
It is an okay question that I have never had a client ask me. Why is it only an okay question? Because it is a straight yes-or-no. Let me give you a better question.
What changes have you made to your inspections or reports because of continuing education?
The difference between the two is dramatic. In the first case, the inspector either has or has not done continuing education. In the State of Washington, the answer should always be yes, they have. It is mandated that home inspectors complete 24 hours of continuing education ever licensing cycle. What isn’t mandated is taking classes that expand the inspector’s knowledge. The individual inspector can literally and legally take exactly the same classes each cycle and get credit for it.
By moving past the CE question to discuss how that has changed the inspector’s process and reporting, you can get a reasonable idea of whether that inspector actually applies the new knowledge on behalf of his customers. More than a canned response about how long they’ve done inspections or what contracting work they used to do, this question cuts to the heart of their expertise and professionalism.
A good inspector is likely to do far more than the minimum in continuing education. As an example, I’m taking the 12th of July off to attend a training seminar put on by Washington State University on the latest changes in the Washington Residential Energy Code. This class won’t count for CE’s since it isn’t approved, but I will learn a wealth of good information and some of that will find its way into my reports.
Likewise, when I went to Seattle in March for the Western Washington chapter of ASHI seminar that had course approvals that counted toward my total, I picked up a wealth of new information. Not all of it is immediately useful, but it does inform me of potential issues to be aware of so that I can provide good advice.
I make two trips per year to western Washington specifically for the seminars. I take my computer with me so I can make changes to my report structure while the information is fresh. Since I take continuing education seriously, it impacts my business very directly.
“Describe any deficiencies of these systems or components.”
Since we do have continuing education requirements in Washington State, every inspectors reports ideally should be evolving. The quote above, taken right from the Washington State Standard of Practice for Home Inspections, means that as the inspector learns new things, it should be reported. Be leery of any inspector who is still doing reports the same way as they did five or ten years ago. Either they are not applying the knowledge they have acquired or they aren't actually committed to continuing education as self-improvement.
How do you verify?
Ask your agent who’s reports have changed the most over the last five years. They see the reports on a regular basis. In this region where we have small communities, they should be able to answer that question about the inspectors they are referring.

7 Tips for Maintaining a Metal Roof
Maintaining a metal roof does not require world-class contractor skills. In fact, in most cases, it just needs a little common sense and careful attention to safety. The following tips apply to most metal roofs, whether exposed fastener, standing seam, or architecturally inspired types that look like slate, cedar shakes, or ceramic tile.
Tip #1 – Avoid Walking on the Roof
Metal roofs are thinner than other roofing materials and prone to getting bent or even punctured when you walk or stand on them. Not only that, but foot traffic can cause low spots and water ponding on near eave and at panel endlaps which will encourage leakage.
Also, each one of those dings and dents, even minor ones add up and alter the beauty of the roof.
So, if someone must walk on the roof (such as yourself, inspectors, service providers, etc.) make sure they know to walk on the flat part of the panels for exposed fastener and standing seam systems, using the joists or purlins for support. The fancier architectural styles of metal roofing will need to be evaluated on a case-by-case basis.
Now for a safety warming. Metal roofs, every one of them, are dangerous. The metal is slick under dry conditions. When wet, frosted, icy, or snow-covered, trying to walk them is likely to be followed by a trip to the emergency room. The general rule of thumb is to stay off it entirely, if possible.
Tip #2 – Limit Debris Build-up
This advice is the same for every roof. Don’t let debris build-up, either on the surfaces or the valleys. Not only does it affect the immediate appearance of your roof, but the breakdown of the materials can stain the roof or under some conditions, actually damage the metal. Also, organic matter retains water. We want the water to leave as quickly as possible to avoid encouraging leaks.
To clean the debris, you can use a blower, a stiff broom, or water. In any case, work top to bottom. I recommend temporarily covering the gutters so you don’t have to spend extra time cleaning them more than once.
Tip #3- Clean the Gutters
What do the gutters have to do with your roof? Well, if they don’t drain properly, they back up and can damage your fascia system. Worse, in winter, the ice from the gutter will form and, glacier-like, try to invade the spaces under the metal. If you have mature trees, clean those gutters annually (at least.)
Tip #4 – Do Not Let Dissimilar Metals Contact the Metal Roof
Certain metals, when they come in contact with each other, react through a process called electrolysis. If you’ve ever seen ‘green corrosion’ on your copper plumbing, that is an example and almost always piping that was attached to galvanized steel without a dialectic washer.
The same thing can happen with your metal roofing. The installer should have made sure when he put the roof on that there were no other metals that would react. Still, be aware of the possibility. If you have a satellite installer coming, or another service person who will be making an addition on the roof, make sure they understand that they need to use compatible materials.
After a big wind-storm or other severe weather event, make sure that all the roofing materials are still in position. A chimney spark-arrester blown off might cause you additional aggravation if not detected.
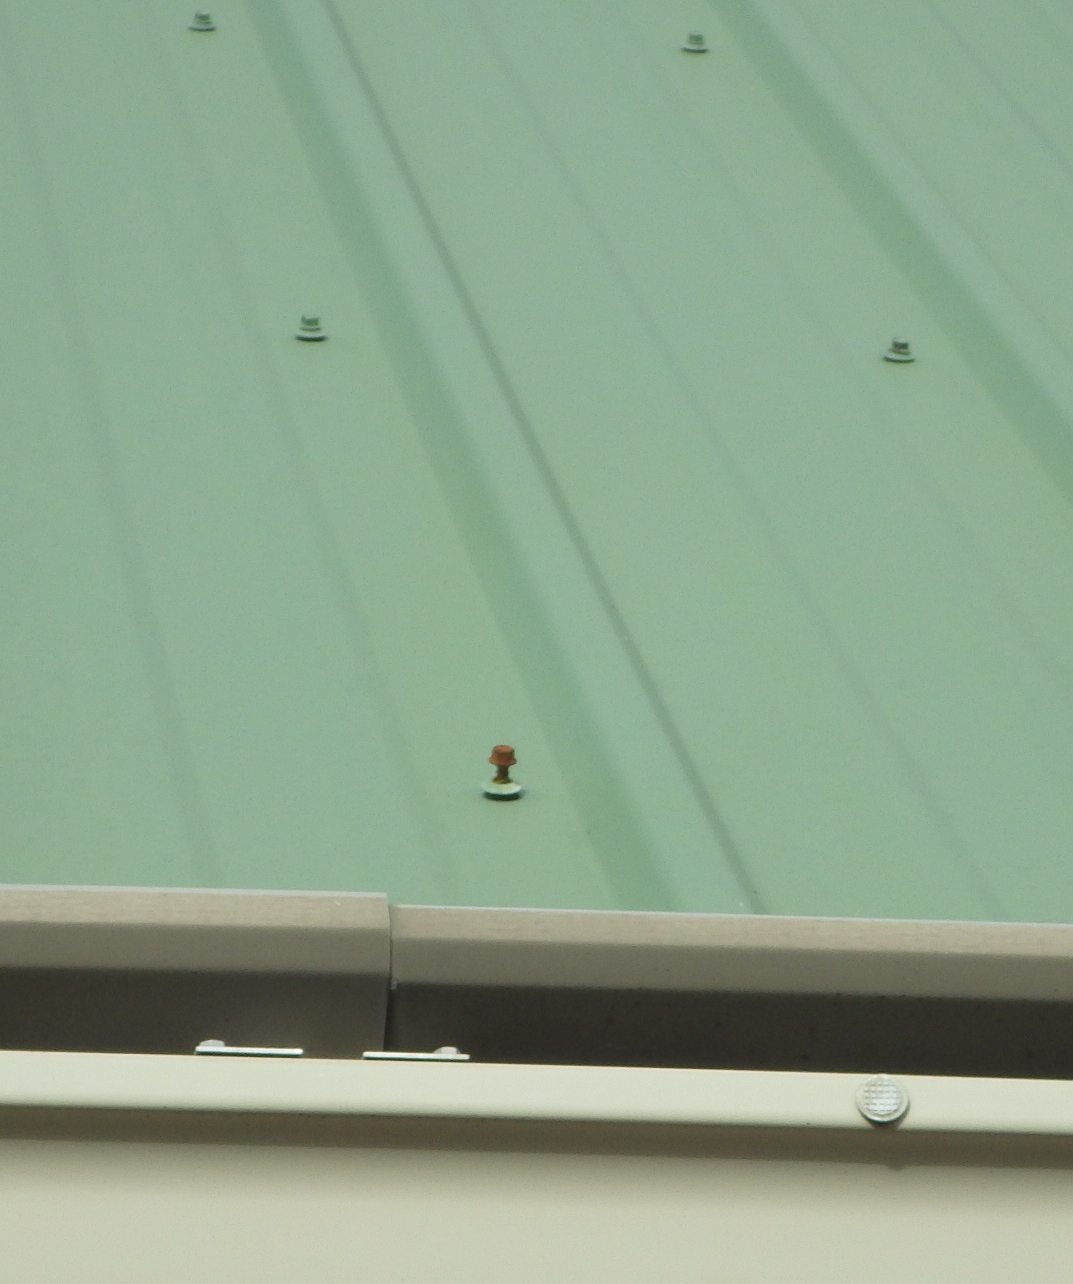
Tip #5-Check for Loose Fasteners
There are two techniques for securing the roof metal to the framing of the house. The first, and most common, is to use exposed fasteners. Nowadays, these are screws with neoprene washers to protect against water intrusion. In the old days, it was nails.
Over time, fasteners tend to loosen, especially at the edges. This allows the wind to get under the metal and can lead to significant damage. Semi-annually, check your roof for loose fasteners. The safest way is to stand at ground level at a point that lets you look up the roof on the same angle as the slope. Fasteners that are protruding are relatively easy to see because they stick up past the roof. Binoculars can help. Any loose fasteners should be replaced.
Tip #6 – Check Your Sealants and Boots
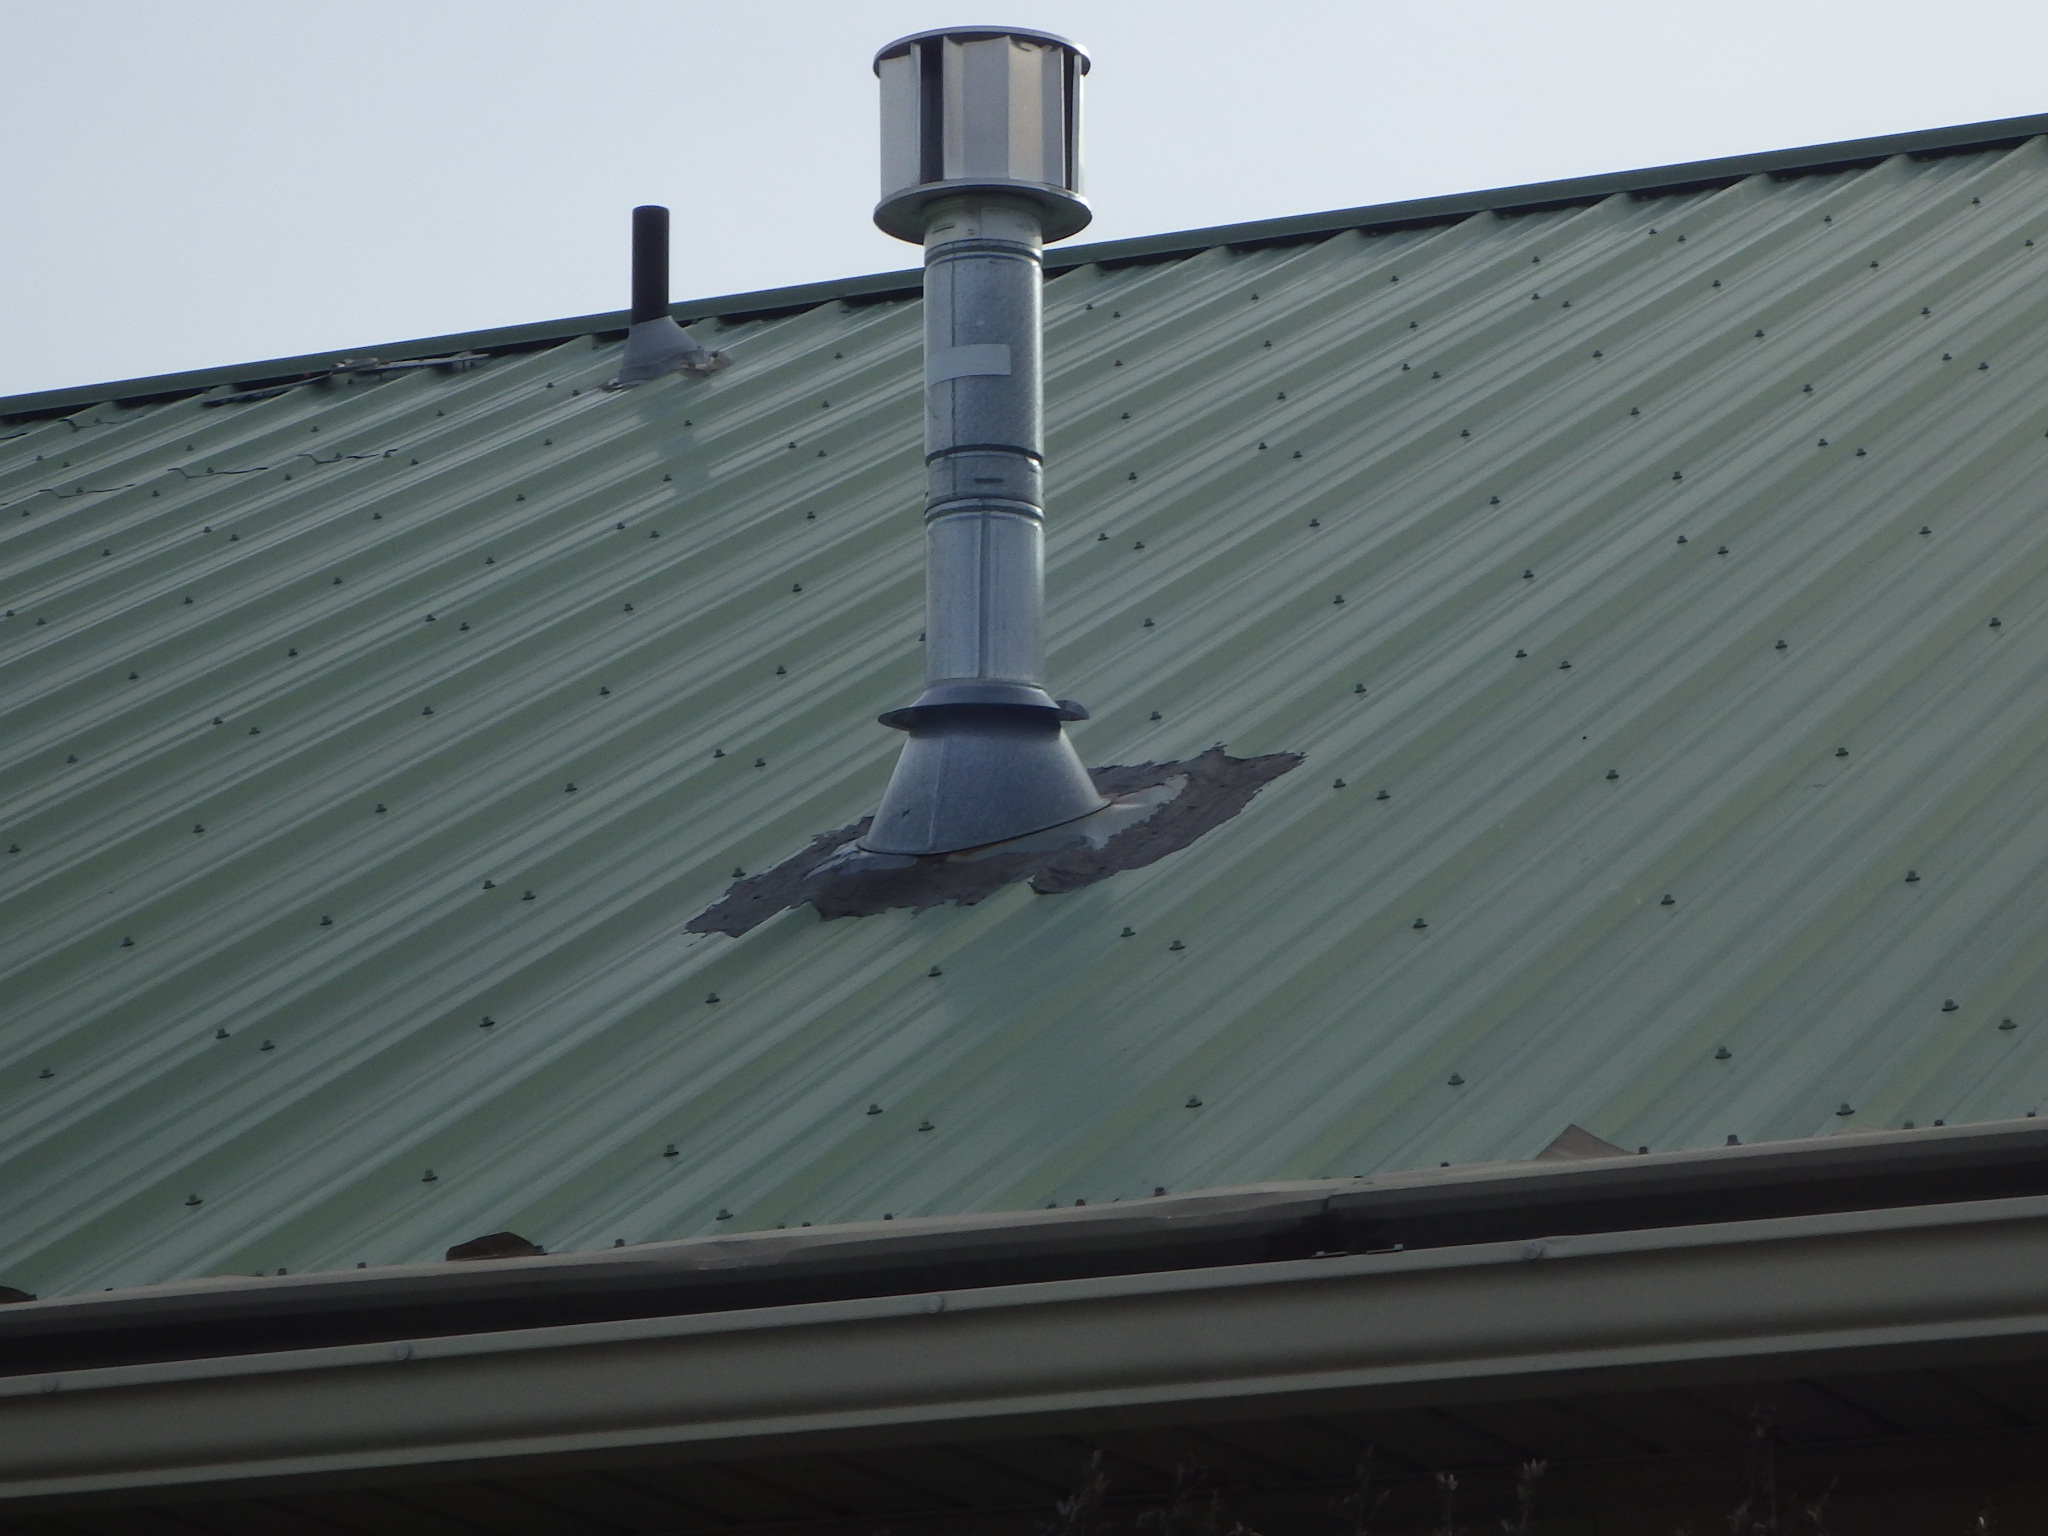
Whoever installed the gas-fired fireplace did NOT understand metal roofing.
Weather exposure degrades silicon sealants and the boots used for plumbing vents. Annually check these for routine wear. Pay particular attention at chimneys, skylights, and valleys – all are prime candidates for leakage. Replace or re-seal as needed. If you are in doubt, call in a roofer with experience with metal. This is one where it is always better safe than sorry.
Also, a very common issue in this area is a person installing the roof without understanding how to do so properly. Your inspection should identify these for repair, but if left in place, pay strict attention to the deficiencies.
Tip #7 – Snow Removal
Just as we don’t let the organic debris from trees stay on the roof, I encourage you to remove ice and snow – when safe! - if it begins to pile up to depths sufficient to damage the framing. Another reason to remove the snow is that metal roofs shed it in avalanche-type clearances. You do not want to be under that when it happens. Make sure to use a snow rake that is safe for metal - you don't want to scratch the surface and create rust.
In areas with harder winters, snow guards may be attached. These capture the snow before it can slide off and provide a holding field to allow the frozen precipitation to melt and drain more safely. I recommend them if you have doorways where snow or ice is likely to discharge unexpectedly.
Now for some guidelines. Realistically, these apply to every roof.
First, inspect your roof on a regularly scheduled basis. I recommend twice a year, spring and fall.
Second, do a precautionary inspection if one of the following conditions occur: after high winds, inspect for loose or missing flashing or trim, damage from falling limbs, and accumulation of and/or damage from other windblown debris; after a hail storm (unlikely here but . . .) check for penetration of the surface coating, damaged sheet-metal trim and flashing and loose fasteners; after an ice or snow storm check gutters, trim and flashing for damage from moving ice or heavy accumulations. Inspect snow guards if present to make they are intact.

Older Wiring in Existing Homes
You can add cautious concern about older wiring in existing homes to the list of things that your home inspector needs to be focused on.
Despite the house building boom that's in progress, most people are still buying used homes. The National Association of Realtors doesn't like that term, preferring 'existing homes'. Regardless of the terminology, 5,540,000 previously-occupied (how's that for invention!) homes sold in 2016. New home construction added 563,000 homes, less than ten percent of the total.
With these older homes comes some interesting issues and the wiring is moving up the list for houses constructed during the Baby Boom (1946-1965-ish). Much of this wiring iscopper with a rubberized thermoset insulative cover with both the hot and neutral cloth-wrapped. Usually, there is no ground wire. For this article, I am focusing on the properties of the wire and won't be discussing the ungrounded nature of it. Another article, another time . . .
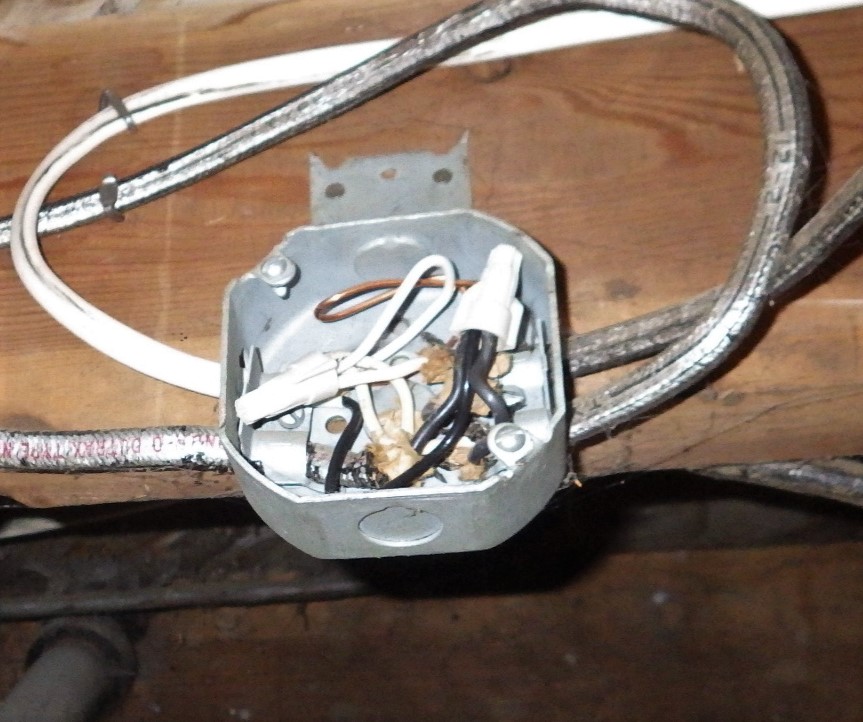
New wiring spliced onto the existing cloth-wrapped wiring.
While this wiring has been remarkably stable, old-age is catching up to it. Specifically, the thermoset coating is beginning to fail. The rubbers are becoming brittle with time. This is most common in the houses built before 1960, but the Residential Electrical Systems Aging Research Project - Final Report was published in 2008, making even this data a decade old.
I periodically hire electricians, plumbers, and such to spend an hour with me, going over the trends that they see in their industries. I recently did this with Jess Izzo of Omega Electric in Pullman, Washington. I asked questions, Jess talked, and I ended up with a page full of notes to apply to home inspections.
According to Jess, the electricians are seeing a greater incidence of wiring failures. When they are called into a home to do even modest repairs or upgrades, they are noting cracked insulation on the wiring. The current fix for this is to re-wrap the wiring. Jess stated that he does this before he begins on the device replacement to limit the amount of deterioration that occurs.
From a home inspector perspective, this means I need to be aware of homeowners who may have installed new lights, receptacles, and devices without being aware of the fragility of the thermoset.
While this wiring is still serviceable and even though homeowners are permitted to perform their own repairs on their personal residence, my advice to home buyers will be to hire an electrician for any work that needs to be done. A receptacle replacement itself is reasonably easy, but the risk of causing unintended damage outweighs the ease.

New Requirements for Water Heaters
With the adoption of the newest plumbing codes, the issue of strapping water heaters against earthquakes just went nation-wide. Mind you, the earthquake risk did not. Whitman County is still a Seismic Zone B, as is Asotin County.
The relevant code is the UPC 507.2 and was adopted by the State Building Code Council. The full text reads:
507.2 Seismic Provisions. Water heaters shall be
anchored or strapped to resist horizontal displacement
due to earthquake motion. Strappings shall be at points
within the upper one-third and lower one-third of its
vertical dimensions. At the lower point, a distance of not
less than four (4) inches (102 mm) shall be maintained
from the controls to the strapping.
This does not (I think) mandate repairs. In my reports, I will be adding the strapping as line and recommending it as an upgrade for older water heaters. For installations after July 1st, a lack of strapping will be listed as a repair item.

Gas Water Heaters for Manufactured Homes
Manufactured homes get delivered with all manner of unique requirements, from hurricane anchors to specific electrical standards. It should not be a surprise that gas water heaters fall into the same category. What is a surprise is the dearth of information that a home inspector can locate on the subject, hence today's article.
The short version is that the types of water heaters permitted to be installed in a manufactured home is severally limited. Per the HUD standards that govern the installation of the water heaters, they must comply with UL 307B, UL Standard for Safety Gas-Burning Heating Appliances for Manufactured Homes and Recreational Vehicles. Having looked up the relevant standard, which is no easy feat, I now understand why so little information is available. UL 307B sells for $894! Sorry, but that is not in this home inspector's budget.

Buried in there is the warning. Good luck to the home inspector that wanted it to be easy!
To be installed into a manufactured home, all water heaters must conform to the UL standard. From an inspection standpoint, my job gets much easier by knowing one critical piece of information. All water heaters in compliance must be marked with a HUD tag. Second best is that some heaters, not approved for use, will say so in fine print on the side of the tank.
There are a couple of visual clues, too, for the installation. Manufactured home water heaters have the cold water inlet connection on the side and the hot water outlet connection on top. Residential water heaters have all connections on the top of the tank. Also, these heaters are of the direct vent type.
Due to the different standard, these heaters are as much as twice as expensive to replace than traditional heaters. This becomes important in my area as we have quite a few aging neighborhood parks. Golden Hills in Pullman is one example, as is Robinson Park in Moscow. While the majority of the heating appliances are electric, about fifteen percent are gas-fired.
As an inspector, I need to be alert to the differences as the current crop of heaters gets retired and new ones get installed. For real estate agents, an awareness of the increased cost is something to be mindful of when negotiating deals. In both cases, the safety of our home owners is paramount.

Inspector Communication in the 21st Century

I have been inspecting long enough that I remember delivering paper reports to all my clients. Since that early start, I have adapted to the times by substantially modifying the report from the "Acceptable, Marginal, Defective" format so prevalent to a more granular report with eleven categories. I deliver the report electronically, from the house, using my phone as a hotspot.

Back then, we did everything by phone and I even had an 800 number for out of state clients. Technology kept marching, and I went right along with it, dropping the 800 number when everybody had cell phones. I don't own a fax machine anymore, either.

That march continues. Video conferencing used to involve massive amounts of equipment that only a large corporation could afford. Today we carry it in our pocket. For my out of state clients, I can contact them while at the inspection if I discover a major defect and we can talk about it right then and there. Not only that, but I can show them what I'm looking at with Skype, Google Hangouts, or Facetime.
The pace of change is thundering ahead. As an inspector, I can choose to keep up with it or turn into a dinosaur. (Seriously, there are still inspectors that don't take pictures!) My default position is that whatever I can do to improve the experience for my client while doing the most thorough inspection that I can is worth the effort to learn the new systems.
Those two items need to work in tandem. The best inspection in the world, poorly communicated, is worthless. Obviously, the reverse is true as well. The second biggest skill an inspector can bring to his job is the ability to talk to and educate the client. At every opportunity, we need to, as an industry, improve to meet our clients needs. They need to be able to talk to use. Video chats simply make that a much more personable conversation.
So, would you like to chat? And do you use any of these in your business?
Who swiped my square footage?
It's getting to the point where I much prefer doing a 1960's rambler over a new home. At least with them, I know what kind of problems to expect. Not so with new homes - and our builders are getting sloppy and the municipal building inspectors are missing defects, a lot of them.
Case is point, yesterday I did a new home, built last year and occupied in December. I followed my usual protocol of inspecting the exterior first, then roof, then interior spaces, starting at the finished basement.
I started at the store room at the back of the house, where the furnace was located. Lots of stuff in there in the rectangular room. That's when a warning bell went off. Made a "unh?" sound and ran up the stairs to fetch my laser measure.
Measured upstairs, from the sliding door to the far edge of the kitchen. 24'2". Add a six-inch wall. Measured the width of the laundry room. 11'1". Total, 35'9". Got it.
Ran back downstairs. Measured from one side of the store room to the other. 24'7".
Ran back upstairs, hurried past my clients. Got into the laundry room and stomped with my heel. Echo-y sound, so definitely not slab-on-grade. Basement or crawlspace. Checked the only closet. No access hatch. Stomp to make sure. Hatches bounce, making them sound slightly different that regular sub-floors. Nope.
Meanwhile, my clients are looking at me as though I am a touch daft. "What's under here?" I asked, pointing to the laundry room floor.
More looks questioning my sanity. Fortunately, I've worked with this couple before, so I get the benefit of the doubt.
I explain myself, that the dimensions don't match. Off we go, down the steps, 'round the corner, and we collectively stare at the store room wall. The husband asks if blueprints would help. "Absolutely!" They're friends with the sellers (it's a FSBO) so they text about plans and the crawlspace.
The reply comes back - they have no plans, nor is there a crawlspace.
Au contraire, I think, got to be something under there. It's not a slab, and it isn't a basement, so crawlspace is the default answer.
This, too, gets explained to the clients. They ask why I need to get in there, given it is a new home. I point out that I need to verify the insulation, vapor barrier, ventilation (I didn't see vents on the exterior wall, so it may not be vented, another code violation), and make sure it is dry. If it isn't dry, we have a potential mold and rot issue waiting for us.
Termites in Pullman are a very rare occurrence, fortunately, or I'd add them to my list of worries.
My clients are bright; they get it. They also don't panic as we analyze the best way to create access. The home is still under warranty, so the builder will be doing the work.
I felt pretty pleased. Like Sherlock in the story "Silver Blaze" with the dog that did not bark, I had done the harder part of inspecting. Any one can see what is there, but a really good inspector will recognize what isn't. It was a good catch.
Gregory (Scotland Yard detective): "Is there any other point to which you would wish to draw my attention?"
Holmes: "To the curious incident of the dog in the night-time."
Gregory: "The dog did nothing in the night-time."
Holmes: "That was the curious incident."

What the heck is CSST?
I get this question a lot, usually from someone angry that I said their CSST was not bonded properly. Electricians especially get annoyed with me, so let me take a bit of time and explain CSST and why it keeps popping up in (my) inspection reports.

Photo courtesy of SoCalGas.com
First, the acronym, CSST, stands for Corrugated Stainless Steel Tubing. This piping is used to transport gas within your home from point A to point B. Simple enough. The physical appearance is a flexible yellow hose-like gas line. The flexibility is one of the major benefits of the piping, eliminating the need to create seventeen turns in the line to get to a specific fixture such as the gas fireplace or stove. This reduction in installation expense compensates for the increased cost of the CSST. Black iron pipe is still cheaper; labor is still expensive, so CSST has earned a solid niche in the building industry. the reduction in fitted connections subject to gas leakage cemented the deal. Builders and code officials alike approved of Corrugated Stainless Steel Tubing.
However, since its introduction into the marketplace in 1990, we have learned a few things about CSST. The most important for me as an inspector is that CSST, while safe under almost all operating conditions, has one issue that necessitates special attention. That condition is an over-charge of electricity along the gas piping. Under those conditions, such as a close proximity lightning strike, the energy travels along the black iron and, when it reaches the CSST, can cause a failure in the flexible piping that creates a fire.
By 2005, a class action lawsuit was brought against the manufacturers. By 2006, with the winds blowing against them, the manufacturers voluntarily agreed to modify their bonding requirements to ensure that the unlikely event of a fire became a remote possibility. In 2009, the voluntary bonding entered the building codes, in both the International Residential Code (2411.1.1) and the International Fuel Gas Code. Quoting the former, "G2411.1.1 (310.1.1) CSST. Corrugated stainless steel tubing (CSST) gas piping systems shall be bonded to the electrical service grounding electrode system. The bonding jumper shall connect to a metallic pipe or fitting between the point of delivery and the first downstream CSST fitting. The bonding jumper shall be not smaller than 6 AWG copper wire or equivalent. Gas piping systems that contain one or more segments of CSST shall be bonded in accordance with this section."
Seems clear. One problem. It's in the IRC and not the National Electrical Code (NEC). Almost every municipality uses the NEC for their model code and this is the standard that electricians adhere to. The pipe fitters, at least in Washington, believe that they are prohibited from making this bonding connection as it may qualify as electrical work, while the electricians are unaware of the need for the bond. The end result is confusion when the home inspector properly identifies the CSST as lacking the proper bond.
According to industry estimates, there is about a billion feet of CSST installed, and much of it is in need to retrofitting.
If you want more information regarding bonding to share with your electrician, go here.

"We all fall down . . . "
Building a deck should not ever be confused with performing brain surgery or doing rocket science. It just not that hard to do it right. There is even a manual, the DCA6-12 put out by the American Wood Council, to tell you step by step how to do it correctly.

So why, on new construction, do I see something like the picture to the right? This wasn't the only problem with the deck, by the way. Flashing details were wrong and the railing was loose, to mention two other problems.
Still, the beam connection was . . . unique. I left the resolution up a bit. First, notice that the joists are attached to a 'beam'. The scare quotes are warranted. They are actually attached to a 2x6 that is cut on either end. In other words, the wood holding up the deck is unsupported from below. It's held in place by screws to the outer 2x6. The outer 2x6 is supported by a piece of untreated wood screwed into the column. It is a prescription for failure.
The DCA6 (Design for Code Acceptance 6 -2012) is a prescriptive standard for success. It has two specific means for making this connection so it is safe and endures through the years.
The first is to notch the 6x6 column to allow the beam to bear directly to the column and held in place with 2 1/2-inch through bolts with washers.
The second method is to have the beam bear to the top of the column and use a post cap to secure the assembly together.
Both of those methods are code-approved and have been for years. Which you use depends on the size of your beam and the elevation from the ground.
Sadly, not enough contractors keep up with the changes and continue to build the way Uncle Bob did back in the day. It's not that hard. The design standard is a free download from the AWC site. Every inspector should have the DCA6 on their field computer for fast reference.
For those of you interested in the nitty-gritty details of deck construction, studying the DCA6 is a great place to start. For those who just want to make sure their inspector has done the studying, make sure they have read and understand the standard. It's your family, or your client's family, that is having a party on the deck.

Is Your Crawlspace Holding Its Breath? Crawlspace Ventilation
In the old days, when curmudgeonly grandfathers ran home maintenance, they'd go close off all the crawlspace at the first indications of frost. The reasoning was simple - once winter set in, leaving the vents open would chill the occupants and freeze the pipes. Best to close them early.
Those old houses, built up through the 1960s often had no insulation in the floor of the home. Heat rises (it doesn't, really, but hot air does) so they did not see the need to waste the money on insulation in the joist cavities.
Fast forward from 1940 to the oil shocks of the mid-1970s and suddenly we were greeted with a renewed interest in energy conservation. We increased attic insulation levels, moved from four-inch exterior wall framing to six-inch and, surprise, found that insulating the crawlspace made a lot of sense.
Grandpa still closed the vents, though. Old habits die hard.
What no one explained to them was that the vents for the space are designed to relieve moisture from the sub-grade spaces. Once we moved the thermal barrier into the flooring system, there was no reason to close them as getting water vapor out far exceeded any energy savings.
The current code is to have at least one square foot of ventilation opening per 150 square feet of floor area with an opening located within three feet of corners. Obviously, home inspectors don't measure this. Still, we can eyeball it and, more importantly, can identify problems that arise from improper venting.
Reporting on the crawlspace ventilation is a mandatory part of a Washington State home inspection. WAC 308-408C-150 states, "Insulation and ventilation. The inspection of the insulation and ventilation includes the type and condition of the insulation and ventilation in viewable unfinished attics and subgrade areas as well as the installed mechanical ventilation systems. (1) The inspector will: Inspect the insulation, ventilation and installed mechanical systems in viewable and accessible attics and unfinished subfloor areas"
The purpose of ventilation, moisture removal, makes a big difference in the overall health of the crawlspace and the structural components located in there. High moisture levels lead to potential pest intrusion and mold growth. Subterranean termites and anobiid beetles both require sufficient moisture to thrive. Obviously, as homeowners, we want the exact opposite. Both of those articles I linked to point out the importance of adequate crawlspace venting.
So, leave the vents open, insulated the floor, and make sure the vapor barrier is in great shape.

Washington State License #215
Former SBCC Member, Former Chairman State Home Inspector Advisory Licensing Board.