

Pullman Air Quality Is Terrible Today (8/20/18)
This happens every three or four years. We're surrounded by forests to our south and west and forests, by their nature, tend to burn after lightning strikes.
The air quality in Pullman is rated at very unsafe today. In Clarkston, it's even worse and has hit hazardous. For those of you who have central air systems but no air conditioner, you can put the fan into the "ON" mode to filter your air. If you have a/c, you can do this so the air is constantly filtered, but you're not paying to cool things down when you don't need to.
Be careful with all your outside activities. If you have folks (children or the elderly) with respiratory issues, keep an eye on them. Asthma sufferers (like me) should use their inhalers early.
Take care, everyone, and be safe. Send some prayers or kind thoughts, as your preference may be, to the firefighters working to save homes and our forests.

Building a Solar Collector
Things get slow over the winter season for me and, as they say, idle hands do the devil's work. In this case, they built a solar collector for my garage.
The project did not require any fancy materials and the basic plans were available on the internet (though I tweaked them considerably.) All told, the project took a couple of days. For someone handy, it would have been a single day project, but my fine carpentry skills start and stop at the "Honey, where's my sledge hammer?" stage.
Building the Collector

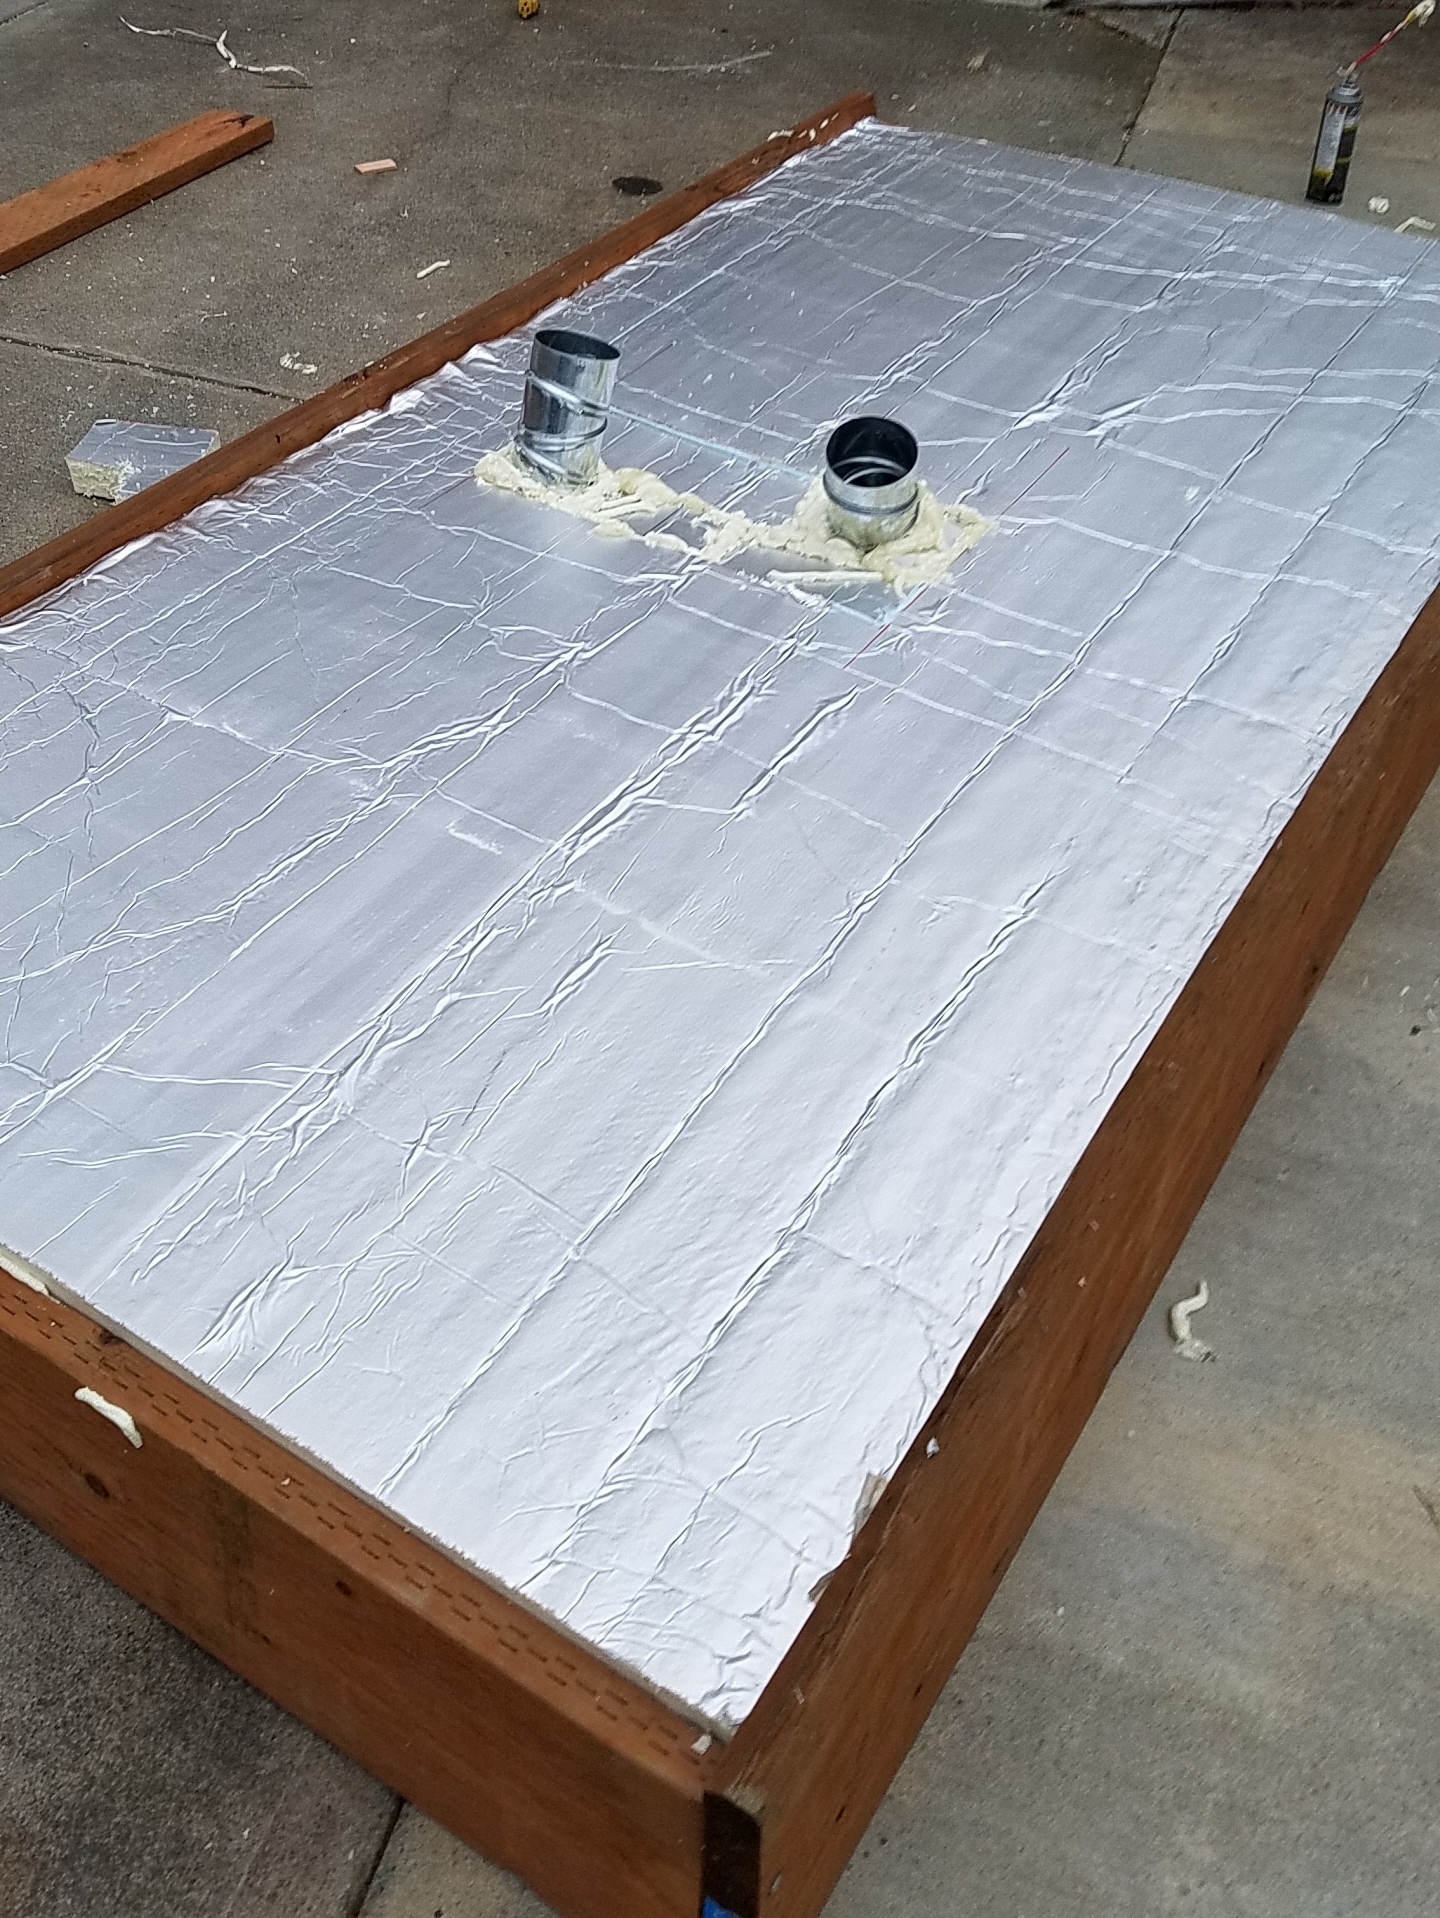
My first step, after gathering supplies, was to build the collector itself. Since I can’t follow a simple recipe, this is where I began deviating from the plans. The colector sits inside the frame and absorbs the solar energy. I intended to use a small duct fan to boost air flow, so instead of designing the system to flow up the screen using natural convection, I made it a down-draft panel with the cold air coming in at the top and the fan sucking the warm air from the bottom.
Then I made three more changes. The original plans called for two layers of mesh. I went with five. I also changed the material from the plastic mesh to black aluminum screeen. (In hindgsight, I think the black plastic mesh would work just as well.) The final change in the collector was to add black plastic to each layer in a staggered pattern so that the air is always in contact with a solid, warm surface.
To anchor all the mesh, I used a frame of 1x2 lumber and mounted each layer on lathe strips (because they are skinny and cheap.)
Building the Box Frame
This is where my general lack of handiness asserted itself. This was combined with at least one moment of total nit-wittery. We’ll get to that shortly.
I spent a bit more money to buy pressure treated 2x12 lumber for the exterior frame. It can be done with less expensive materials, but I paid the additional cost in the dual expectation that the collector would work (there were doubts among friends, family, and the neighbors) and that it would last the next 20 years.
I cut the wood to fit with the bottom edge of the supporting side beveled to improve my angle to the sun. Then I inserted the top and bottom planks and proved to myself that I can be an idiot.
I built the collector to be four feet by eight feet. When I inserted the top and bottom, they were slightly larger than four feet so I could get the collector in without busting it apart. So far, no problem. I bolted everything together, easy as pie. Then I tried to drop the collector in – and discovered my little math error. The collector wouldn’t fit by 1.5 inches. When I measured for the longer axis, I neglected to account for the thickness of the bottom board.
Crud. Given no choice but to undue my work, I did. Re-measured (carefully this time!) and put everything back together. This time, the interior collector fit, if a bit snugger than I intended.
Insulate, Seal, And Ductwork
The next phase was to insulate the box with foam and caulk seal all the joints. Pro-tip for homeowners – if you want to save money on heating and cooling, don’t by a fancier furnace or expensive windows. Insulate and air seal – you’ll get your money back in a year or two.
Once the insulation was in and I got caulk smeared everywhere, I added the ductwork using inexpensive dryer ducting. I insulated that, too. Flipping it over, I caulked the plexiglass to the front of the frame and the collector was ready to move to the south side of the garage.
Remember the bevel cut at the bottom? The second purpose for that was to add stability to the whole frame so I wouldn’t need to screw it to my wall. The frame is heavy enough that wind will not bother it.
The ductwork extended past the back of the box enough to enter in a window. Just as I didn’t want a dozen screw holes in my siding, I didn’t want to cut holes into it, either. So, the window. I framed out ducts with more insulation, sealed with expansion foam and used the window to lock things down tight across the top the same way you would with a window air conditioner.
On the inside of my unheated garage, I ran a 20 foot length of dryer duct and added the fan. The discharge point is right over the laundry machines. The fan is on a timer.
So Does It Work?

Better than expected, actually. The heat on a sunny day coming from the collector exits at better than 100 degrees. Remember that this piece of ducting is 20 feet long, so there is considerable temperature loss along the length of it. When I measured the immediate discharge piping with my infrared camera, the temperature was over 140 degrees. Very pleasing!
On really cloudy, rainy days, it works, but not as effectively. The heat output is usually between six and ten degrees above the input temperature, so it is still heating.
During an average winter, the garage gets down to freezing and stays there. This year, it has gotten as warm as a balmy 63 degrees.
All in all, a fun project that will also save me money in the long run, and it’s kind to Mother Nature. I think I’ll build another one next year for my office.
Why Remove the Service Covers?
Part of the Washington State SOP is removal of the access covers for furnaces. It seems like a bit of common sense, but not every inspector will do it, especially if the furnace is relatively new or electric.

Yesterday's inspection gave me a great example of why the cover should be removed. The induced-draft furnace, a Carrier wasn't that old. It was a bit of a problem to get to it since the builder put in the crawlspace.
Before I clambered into the under-floor area, I set the thermostat up by ten degrees so I could put a heat demand on the system. When I reached the scuttle, I could hear the inducer spinning up and the furnace ignite. All good.
I let it run while I did the crawlspace inspection (also required under Washington's SOP.) After taking pictures of the issues there, I turned my attention to the furnace.
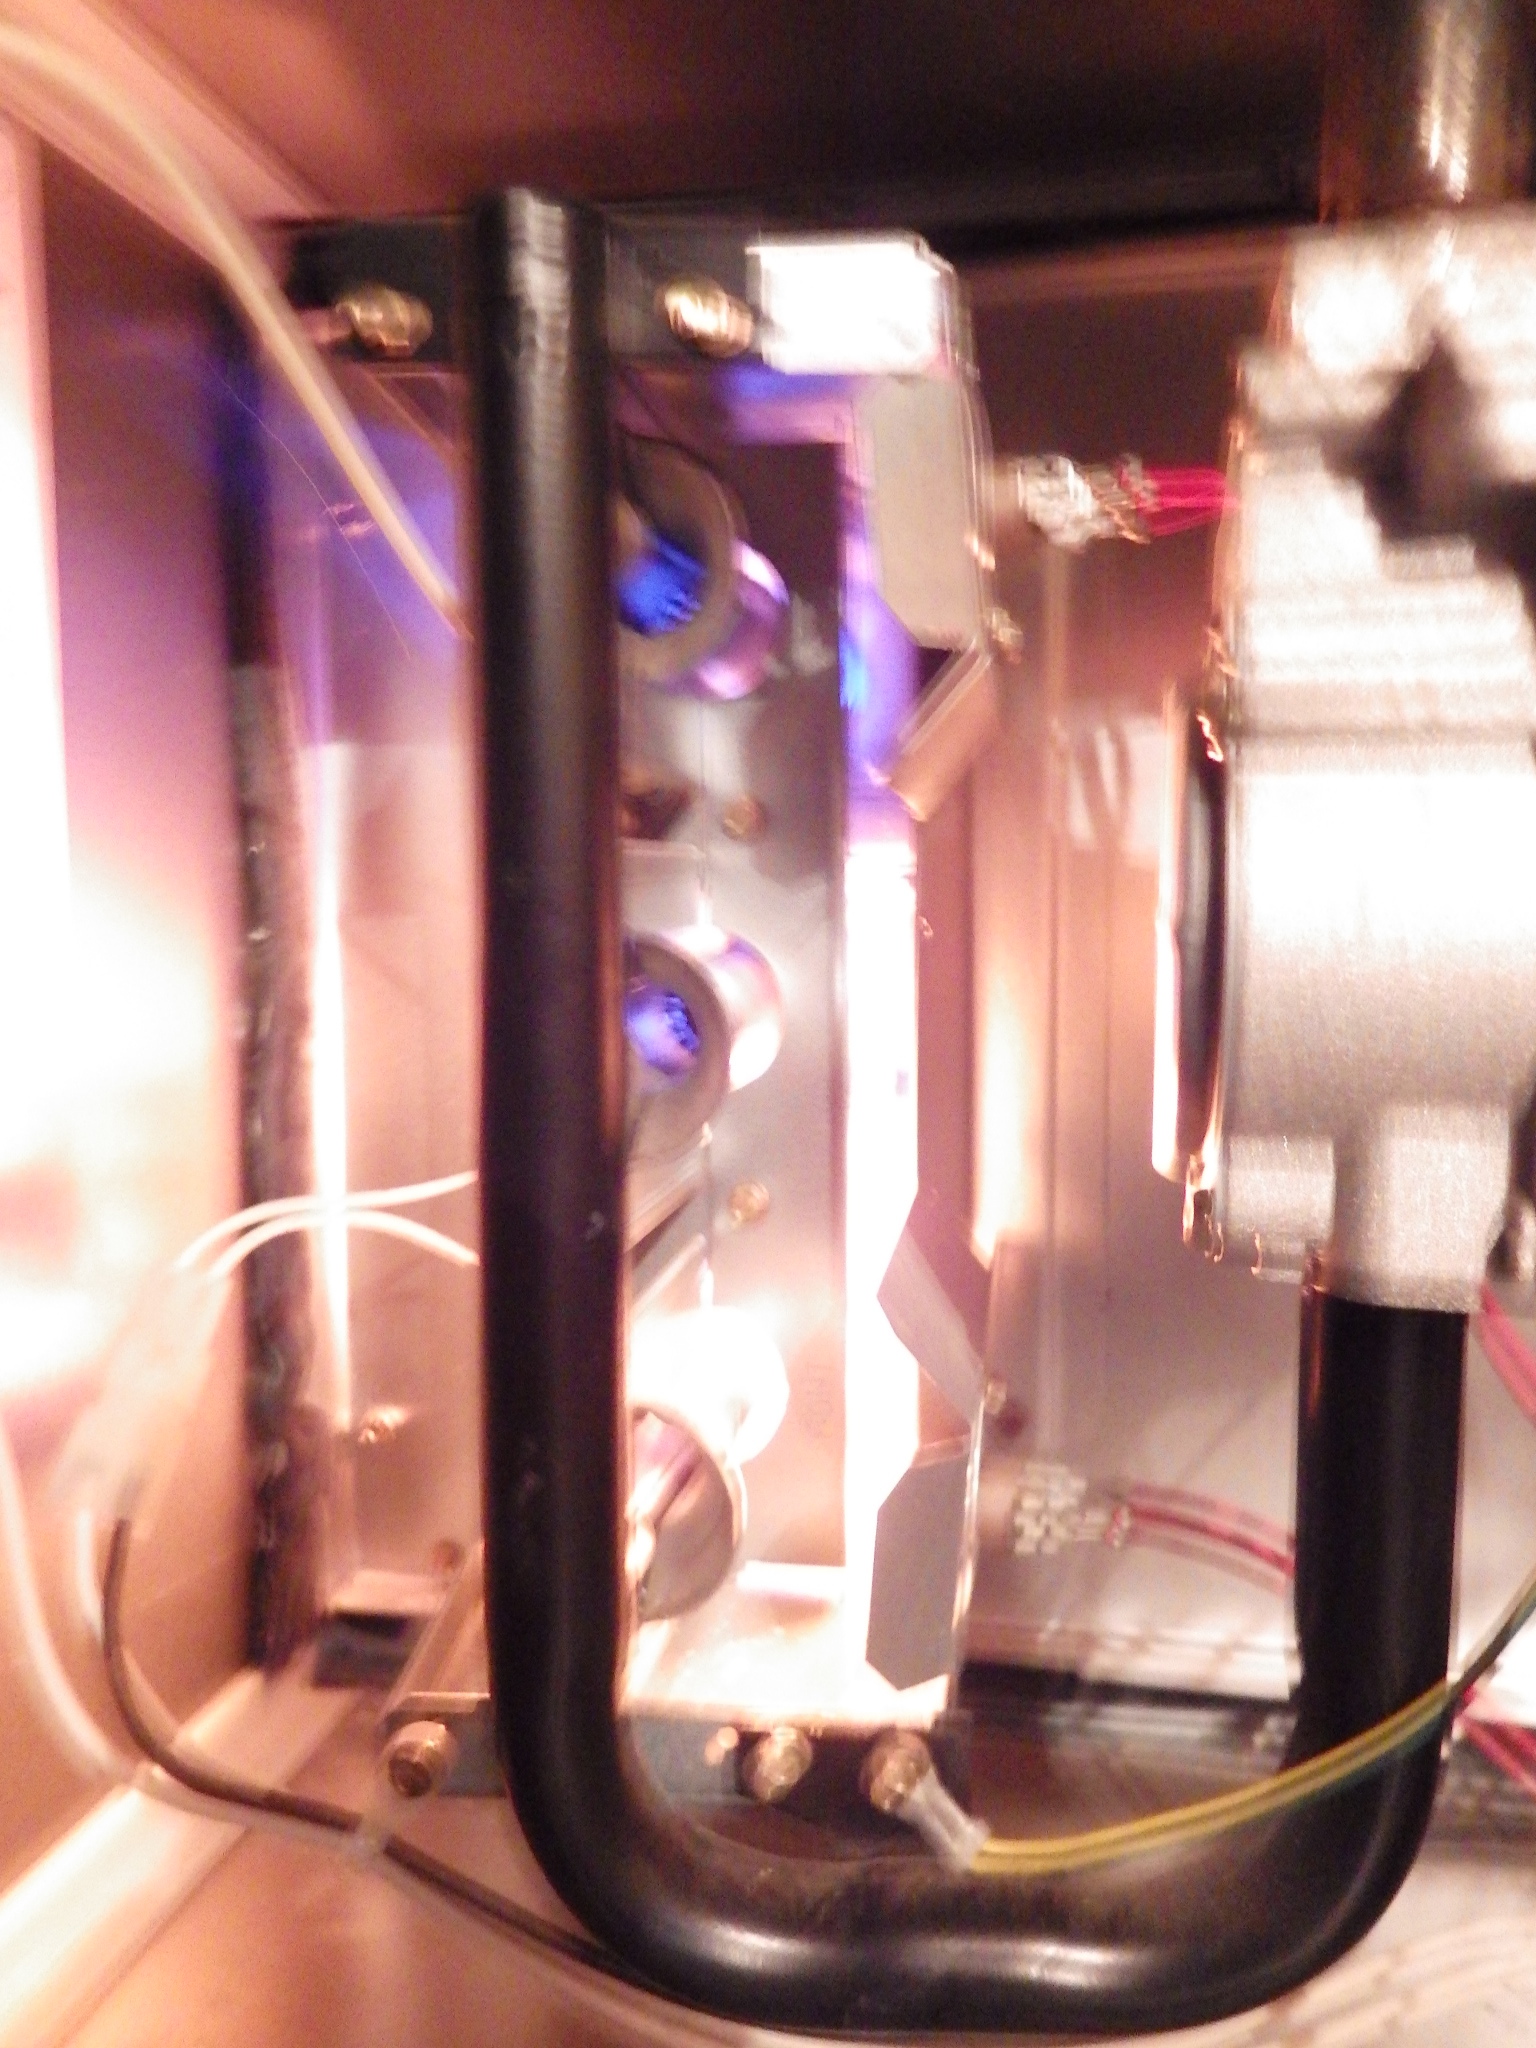
It was side-mounted with the burners to my left and the blower compartment to my right. To get the cover off for the burners, both covers needed to be removed. This shut down the whole furnace, as it should, when the blower door safety switch released.
I fiddled with the blower door and remounted it with it to restart the furnace which obligingly did so. Saw the glow of the hot surface igniter and heard the woosh of the gas burning. And, from the corner of my eye, an oddity. The flame on start-up didn't look right. A few seconds later, the furnace shut down on its own.
Most modern furnaces has a sight glass to the electronic control boards. On these boards, there is an LED (light emitting diode) or two that will signal an error code. In this case, it was three short lights followed by three long. The legend indicated a flame roll out or limit switch failure.
I used the serviceman's switch (a switch located within sight of the piece of equipment that turns power off to it) and reset everything. The furnace started, ignition, and ran without incident.
Have I mentioned I hate intermittent problems?
So I reset everything, again.
And the furnace failed, again. This time I got the (not very good) picture of the flame roll out. If you look closely to the left side of the picture, a tongue of flame dodges the normal flame path and appears to be hitting a wire.
If I had taken the easy way, to start the system and count it as working by just the first start-up, I would have missed a critical detail of the operating status of the furnace. By pulling covers and testing both safety switches, I gathered better and more accurate information. Better still, I found a condition that might lead to a house fire. Protecting the people in that home is the most important part of my job.
The cost of repair probably isn't much, in this case. I say probably because, while the issue may be as simple as adjusting the gas and air mixtures, a cracked heat exchanger can present this as well. In that case, replacement of the whole furnace may be necessary. In between, the venting of the furnace may be a cause.
As a home inspector, determining the cause is beyond my purview. Finding it, though - that's solidly in the inspector wheelhouse.
Air Quality in a Forest Fire
With all the fires burning around us, air quality is horrid. As I write, both Moscow and Lewiston are in the hazardous range, and Pullman is only marginally better.
For those with central air or furnaces, you can use the blower on the system to help filter your air. The thermostat should have a fan setting that you can switch from 'Auto' to 'On'. This will start pulling air through the filter and clean it for you. The cost of running the system in this mode is pretty negligible.
For those of you challenged by the dust at harvest time, this will work, too.
Be safe, everyone.
Underground Oil Tanks
In the last month or so, I've run into a ton of misinformation regarding underground oil tanks. Early in the month, at the ASHI-WW training session, I got involved in a conversation with inspectors from western Washington. Apparently, there are companies on the west side that will remove the tanks and perform mitigation, for $5,000-$10,000. Discovery of an oil tank on a property there often kills the deal in a dispute about who mitigates the problem. By the way, keep in mind the size of those tanks. It's actually an important number. The second occurrence was on the Idaho side of the line. Similar deal, oil tank was present (and in use with a converted coal-burner now acting as the oil-fired boiler.) The agent was concerned because, in her investigation she had contacted the City of Moscow, who referred her to the Idaho Department of Environmental Quality (DEQ) and said that there were the folks that managed the decommissioning of underground oil tanks. Folks, any time the DEQ gets involved the price tag goes up. It's the nature of what they do. In this case though, the City of Moscow gave bad advice, the same bad advice that the Washington home inspectors have been getting.
First, a little history . . . .
Above Ground and Underground Oil Tanks
These tanks store the oil that is - or was - used to fire the furnace in the house. Depending on the region, these tanks could be above or below ground. Above ground tanks made for easier monitoring but the home heating oil has a tendency to 'jell' in extreme cold so a means of keeping the oil liquid and flowing was a necessity. The above ground tanks were easy to deal with when the homeowner eventually converted from oil to gas or electric heating. Empty them out and haul them away.
Underground oil tanks poses separate issues.
There are thousands of unused underground residential heating oil tanks in existence and many still contain heating oil. These tanks are typically 300 to 500 gallons in size and made of 12 gauge steel (about 1/8 inch thick). They average about 30 years before corrosion makes them prone to leaking, but the life of individual tanks varies widely depending on the properties of the surrounding soil.
These tanks were often just abandoned in place, the only clues that they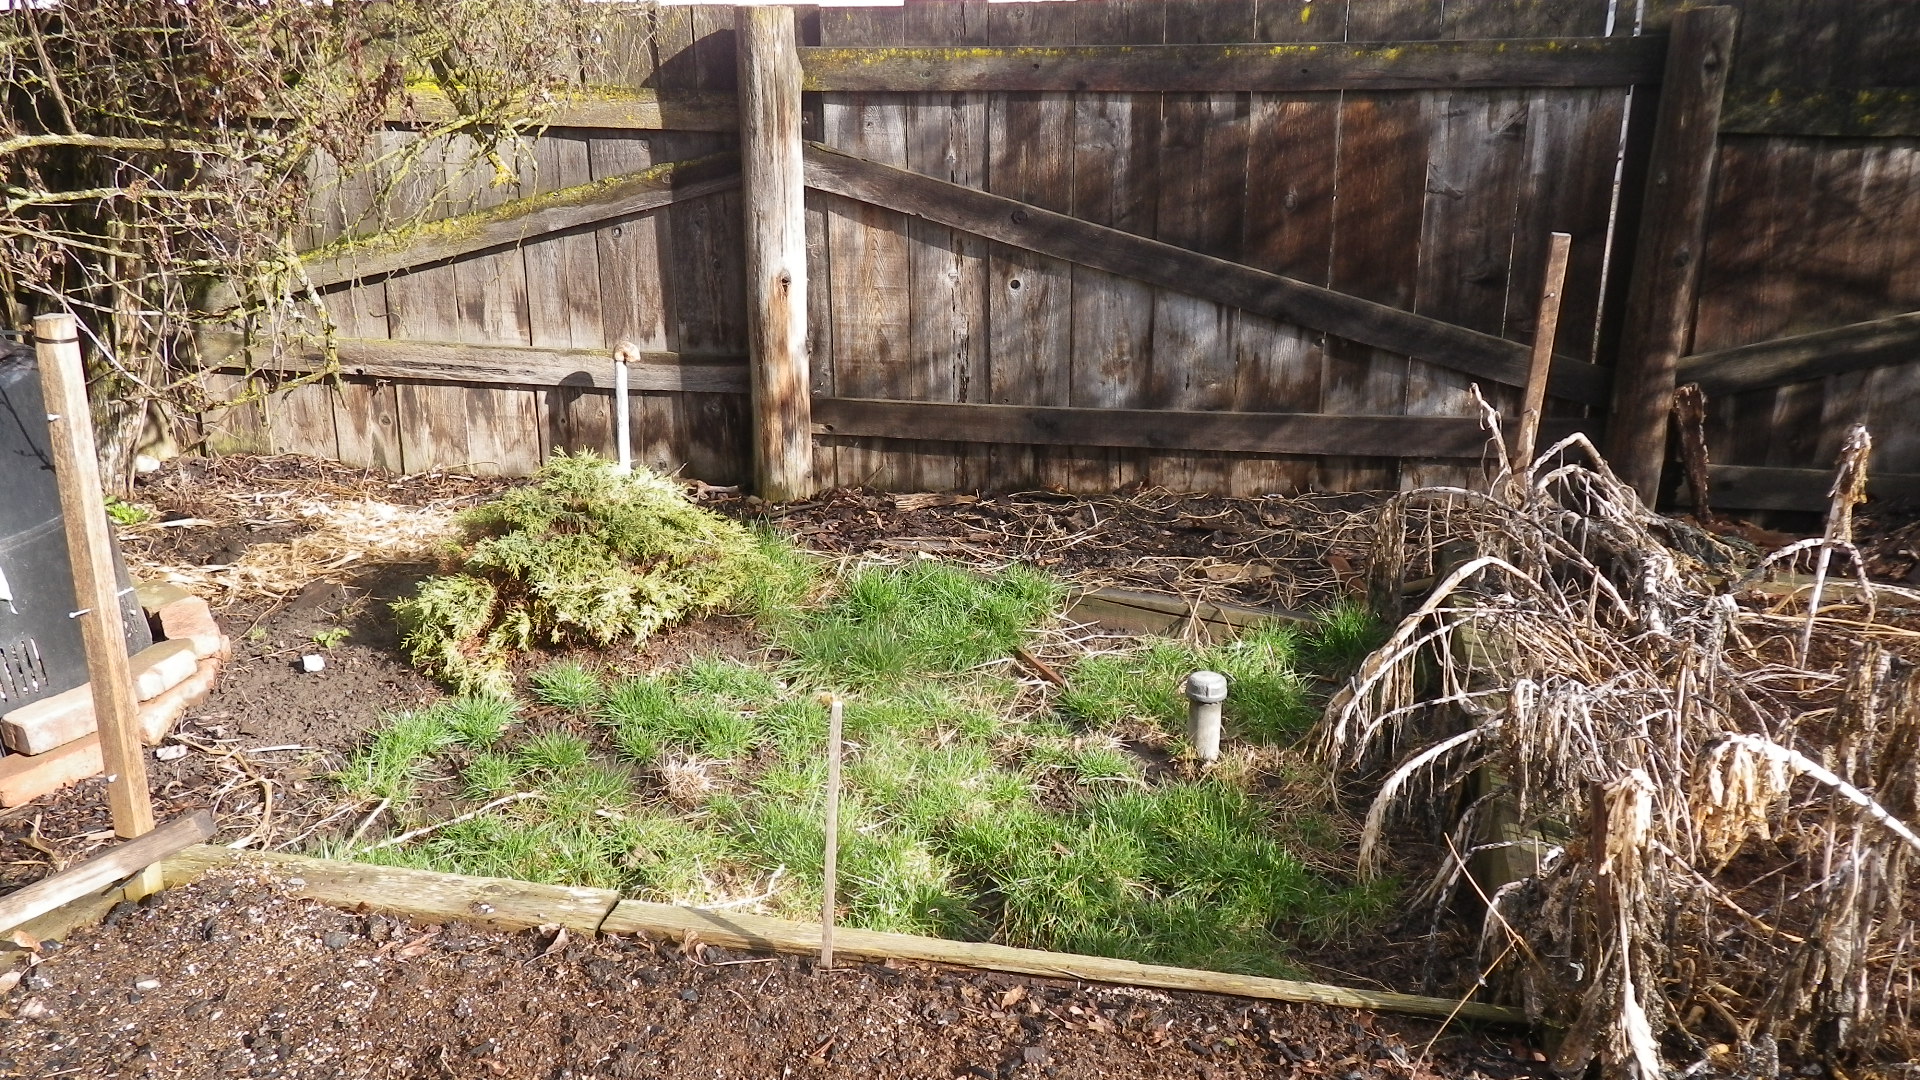 still exist, a copper feed line, or a breather vent, or the fill cap. Most of the tank, ranging in size from 200 to 500 gallons, are hidden from view. Even the pieces above the ground on the exterior - the fill pipe and breather vent - might be obscured by vegetation. In short, they can be really difficult to identify.
Under Washington State regulations, the home inspector is required to "Report any evidence that indicates the possible presence of an underground storage tank."
Myths
Myth 1 - The EPA regulates underground storage tanks so homeowners need to follow their regulations
This is the source of most of the confusion. Remember when I said to keep the tank sizes in mind above? Yep, they're important. The EPA regulates fuel storage tanks that are larger than 1100 gallons. Home heating oil tanks are specifically excluded statutorily from EPA regulation (with a large caveat that once the tank leaks and reaches a body of water, you've got a huge problem.) The EPA site has this statement - "Tanks used for the storage of heating oil for consumptive use on the premises where stored are excluded from federal UST regulations. However, state or local regulatory agencies may regulate these tanks."
Myth 2 - Washington State, Idaho State, Regulate Underground Storage Tanks
They do - in exactly the same way the EPA does. Again, the threshold for both states for regulating UST's is 1100 gallons. The State of Washington has a handy little flyer that will lead you through the process. Quoting Washington State, "Neither the federal government nor Washington State regulates the use or operation of residential heating oil tanks."
Since I live on the border between two states, I get to check everything twice. Sure enough, Idaho has a similar flyer, a little longer (head for page 6 - that's where you'll find the stuff for homeowners) that expressly states. "Some kinds of USTs are not covered by these regulations: Farm and residential tanks of 1,100 gallons or less capacity holding motor fuel used for noncommercial purposes."
Myth 3- A leaking oil tank is a huge liability to the homeowner
This one is partially true but only under certain circumstances. I'm going to use the Washington State Department of Ecology answer for this one as it is the most straight-forward. You are not required to report minor spills or leaks. They specifically defined a minor spill as ". . . those that affect only the soil near the tank."
The point where liability becomes a major concern is when one of two events occur: first, the spill contaminates a water source, whether it is a natural body of water such as a stream, river, lake, or well; and, second, if the spill impacts a neighboring property and contaminates it. There are ways to manage these risks if you have underground oil tanks on your property. Both states maintain programs to assist homeowners with insurance that would likely be impossible to obtain otherwise.
Washington State has an insurance program for homeowners - it's free but not transferrable. Go to the Pollution Liability Insurance Agency to get the details.
Idaho has a similar program but it's not free. There is a $25 annual fee to access the services at the Idaho Petroleum Storage Tank Fund
Myth 4- My underground oil tank is not in use. I have to remove it.
Maybe, but probably not.
The places to check on exactly how you are obligated to handle a tank decommissioning are the local building department or the Fire Marshall's office. I'd contact the Fire Marshall first as they usually have a better idea of the local regulations than the building departments, especially in smaller locales.
You are required, if the tank has been out of use for more than 1 year, to decommission it.
You have two options for decommissioning. The first is removal and this is by far the most expensive option. The second is to fill and abandon in place. Let's look at both.
Removing the Tank
First, understand that this is generally not required by law. Most municipalities realize the expense involved. Also, tanks that were accessible in the past may be hard to reach with the necessary heavy equipment now that the neighborhood has filled in and the landscaping has matured.
Both state environmental department - DEQ in Idaho, Ecology in Washington - recommend this option. Their argument is that it is easier to identify leaks this way (which they will then likely make you mitigate at your cost!) and that some mortgage lenders or insurers will want the potential hazard addressed. On the first point, they have a vested interest in the cleanup process.
The second is a case by case process. A properly decommissioned tank that has been fully documented to meet the applicable regulations probably will not trigger a problem for you in the loan process. The key is the documentation.
Leaving the Tank in Place
This is a popular method to handling oil tank issues due to the reduced cost.
First, a warning. You can't just leave the tank and not do anything. Old tank will rust and they are subject to floating out of the ground in areas with high water table and to collapsing from rust. Usually that collapsing is encouraged by an unsuspecting soon-to-be emergency room visitor when they walk or play above it.
Decommissioning underground oil tanks requires a few steps. The early steps are the same for removing the tank.
- Pump all remaining oil from your tank
- Clean out any sludge in the bottom of the tank.
- Remove or cap all lines.
Here things separate. With removal, you uncover, lift out, and check for contamination before backfilling.
Abandoning in place requires a non-compressible, leak-proof fill material. Commonly, we'll see a weak cement slurry, sand, or foam. Personally, I favor the weak sand slurry. It's the same material that many utilities use to backfill trenches for gas line, fiber optics, etc.
Before You Begin
Whichever option you choose, make sure you check with the local jurisdictions first. You will almost certainly need to obtain a permit in a larger city. Smaller cities and towns may not require it but check anyway. You may discover that they have useful information regarding soil structures and local hazards that will be helpful in making a rational decision.
Hire a company that specializes in underground oil tanks. Bob the local handyman is probably not your best option for this project. Check to make sure that they carry the appropriate licenses and that they are insured, both for the tank services they are providing and also for general liability for any damage they might accidently cause.
After You're Done
Maintain a paper trail of all the work that was done, by whom, in a file. To document decommissioning of the tank, the property owner should retain a copy of the any reporting forms used by the local municipality, any permits, as well as all receipts, certifications (including those of the contractor that you wisely verified), and written materials associated with the project.
Make a copy of the file for yourself, and when you place the home on the market, a copy for your Realtor.
Inspecting dryer vents should be as dull as doing laundry
 Inspecting dryer vents should be as dull as doing laundry but, unfortunately, sometimes isn't. It doesn't take much effort to lift the flaps on the vent termination if it is somewhere near ground level but if it's on the roof or high on a second floor wall, the inspector won't be able to reach it for inspection. Adding to the problem is that the inspector is supposed to check the condition and length of the exhaust piping but not required to comment on the interior of the line. It's worth doing both.
I ran into the height problem late last week. If you look just to the right of the dormer, you can make out the termination points for the laundry vent and the dryer exhaust. The exhaust is on the right and is gapped slightly open. Since I knew the dryer wasn't running, I grabbed binoculars and could see the lint piled high at the opening.
Inspecting dryer vents should be as dull as doing laundry but, unfortunately, sometimes isn't. It doesn't take much effort to lift the flaps on the vent termination if it is somewhere near ground level but if it's on the roof or high on a second floor wall, the inspector won't be able to reach it for inspection. Adding to the problem is that the inspector is supposed to check the condition and length of the exhaust piping but not required to comment on the interior of the line. It's worth doing both.
I ran into the height problem late last week. If you look just to the right of the dormer, you can make out the termination points for the laundry vent and the dryer exhaust. The exhaust is on the right and is gapped slightly open. Since I knew the dryer wasn't running, I grabbed binoculars and could see the lint piled high at the opening.
By now, most homeowners have seen/read/heard that a clogged dryer line can cause a fire. When the dryer is operating, the designers expected the heat to flow out the exhaust line and dissipate. If the line is partially or fully plugged, this out-flow is restricted, increasing the heat at the dryer. And the lint? It counts as a combustible material.
But there is a second problem with clogging the pipe. What happens to the water? You know, all that moisture in the damp exhaust that makes those billowing clouds of steam in winter?
If you said it gets trapped in the line, you win an award. Feel free to celebrate because that's exactly what happens. I hit the attic in the house above and found wet insulation. First instinct is to start  looking up for the source of the water. Not a sign of moisture on any of the sheathing or framing materials.
I reach down and touch it. Yep, definitely wet.
Then I looked to the right, toward the exterior wall. Another wet spot and, finally, the light goes on. The water wasn't coming from above. It was getting forced into the attic space by the dryer below.
The vent piping was plugged and the excess moisture was blowing through every joint in the piping. (They had used duct tape for the joints - another bad idea as it won't hold.)
I checked the OSB sheathing. It was wet but hadn't begun to develop mold or lose integrity. Given another year, this would have transitioned from a moderate problem to a big problem.
The solution for my client was two-fold. First, get the dryer vent line cleaned. Second, make sure it meets the current best practices.
The solutions for dryer line blockage are pretty straight-forward and industry recognized. The pipe material should be rigid or semi-rigid metal ducting (NOT the white vinyl and preferably not the ribbed Mylar), have a length of no more than 25 feet (not counting turns-turns reduce the allowable length because they slow air flow), and vent to the exterior of the home. You shouldn't use screws to connect segments of pipes (lint gets captured on the screws), use an approved heat tape for joints instead of duct tape, and the point of exhaust should not have a screen. Easy. Not done correctly often but easy.
Inspecting dryer vents should be on your annual to-do list.If you have a vertical run that terminates on the roof, think about doing it more often. Clean it often, at least every year. It's better for you home and -added bonus - the improved efficiency will save you money.
So what happens if it DOES snow?
 One advantage of living in Asotin is that the whole Lewis-Clark valley is considered to be a 'banana belt'- we're normally 10 degrees warmer than the surrounding prairies.
We're also a desert. The average rainfall in Lewiston, Idaho is about 13 inches per year. Pullman get about 20 inches which makes it a semi-arid desert but the great soil in the Palouse hold water well and allows for dry land farming. A lot of their moisture happens this time of year, in the form of snow.
One advantage of living in Asotin is that the whole Lewis-Clark valley is considered to be a 'banana belt'- we're normally 10 degrees warmer than the surrounding prairies.
We're also a desert. The average rainfall in Lewiston, Idaho is about 13 inches per year. Pullman get about 20 inches which makes it a semi-arid desert but the great soil in the Palouse hold water well and allows for dry land farming. A lot of their moisture happens this time of year, in the form of snow.
In the valley, we snicker. Most of the time, if we get 'snow', it's a dusting and we broom it off as we get on our way. Very little fuss.
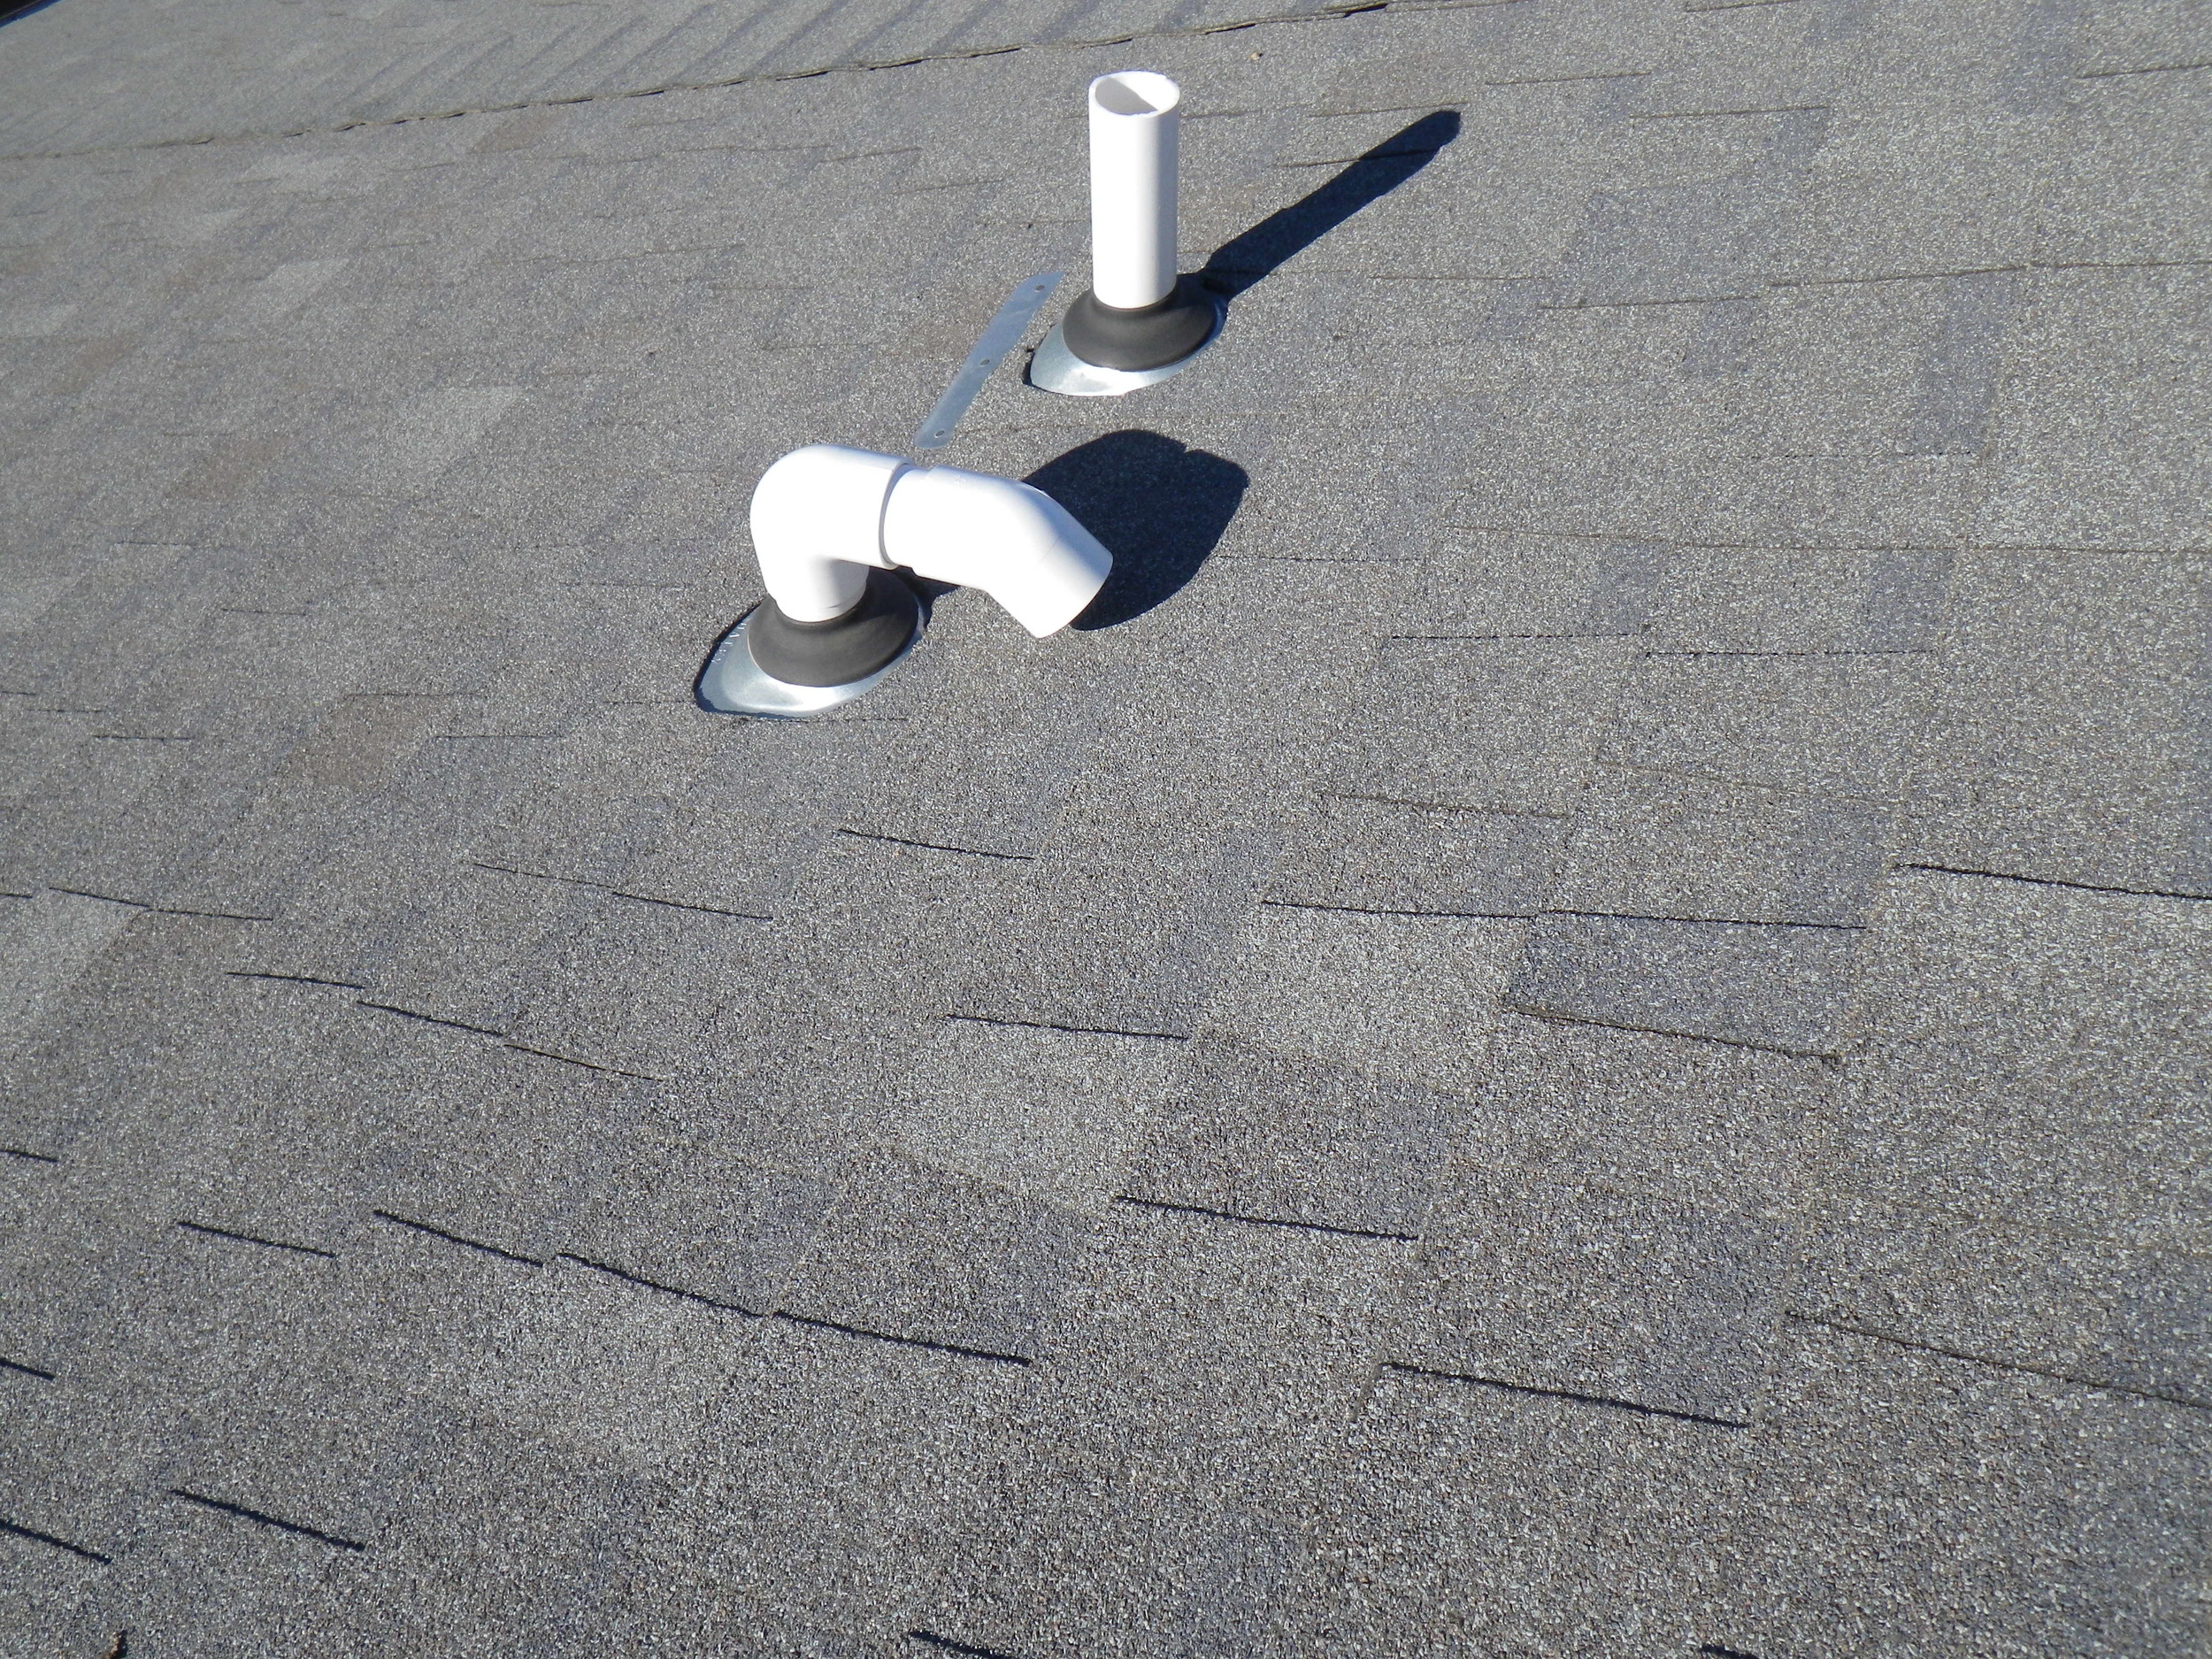
This leads the builders in the valley to occasionally entertain bad ideas on what constitutes good construction. If you take a quick gander at the picture above, you can see a prime example.
The picture was taken on an inspection of a brand new home. Can you see the problem?
Yep, whoever it was that pointed out the air intake (the curved one) is way too close to the roof deck wins a Tootsie Pop.
The intake should be much high off the roof deck (I recommended 12") so that, in the event of snow, it doesn't get blocked. The ultra-high efficiency furnace that is connected to the intake has a sensor that measures how much combustion air is getting pulled in. If it doesn't sense enough air, the furnace will not start.
Bad.
It's winter and we definitely want the furnace to fire off and keep our tushes warm. We also don't want to make a service call (on overtime rate because it always happens that way - Murphy's Law is immutable and irrepressible) to get a perfectly acceptable system working again. And even if you know what the problem is, do you really want to climb onto a snow covered roof to fix it?
This is an easy fix. Add some height to both the exhaust and air intake. Viola, end of this particular problem.
And yes, it should have been caught by the building official but cut them a little slack. Like the rest of us, they're human and can miss something. Yes, it should have been caught by everybody up and down the construction cycle. That's why you hire an inspector, even for new homes-we're the last link in the chain of people (builder, contractors, code official, agent, inspector) that are trying to make you happy in your new home.
Keep that intake clear and stay warm, folks.
Cracked Heat Exchangers
Cracked heat exchangers are not just expensive - they can be dangerous as hell. First, background. A gas-fired furnace (oil, too) has two different air-handling systems. The one most people think about is the blower that moves that wonderful warm air through the house on days where the temps, like today, are in the single digits.
The second system is the air supply for the burning of the gas. The furnace needs this air for combustion. The resulting flue gases are a mix of the air, minus a goodly portion of oxygen, and the fuel, minus a goodly portion of the chemical energy. That's where the heat comes from.
To get it into the house, we need to move the heat from the combustion cycle to the air-handling equipment. That's the role that the heat exchanger plays. It's a shell of metal that contains the noxious gases of combustion. The walls of the exchanger heat up and transfer the heat to the air driven by the blower.
The old furnaces from the 1960's and early 70's had thick shells and some of those old Lennox's can be hard to kill with anything short of a bazooka. Newer furnaces, especially the ultra-high efficiency condensing furnaces, don't last nearly as long. The new ones have much thinner shells and, to create greater surface area for the heat transfer, lots of dimples in the surface. Consequently, they tend to suffer metal fatigue faster than the old furnaces. Failures in heat exchangers have been reported in units that are only 15 years old.
Back to the noxious gases. What happens when the heat exchanger cracks? Well, we no longer have a separation between the gases and our interior air, the atmosphere that we breathe. The flue gases escape into the living 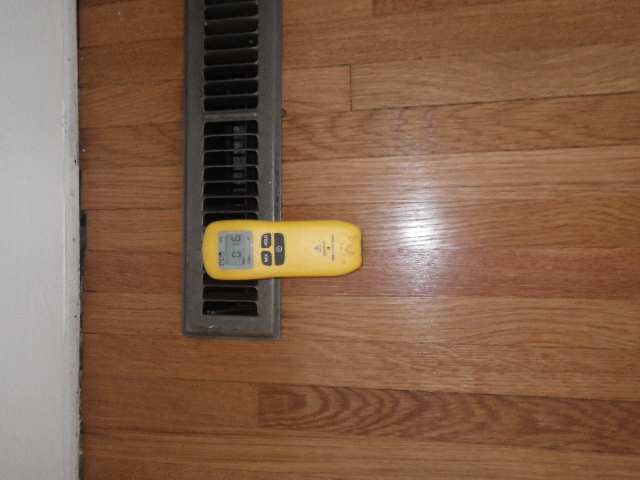 spaces. The principal gas? Carbon monoxide.
The reading on my handy little toy there indicates that the furnace is releasing 16 parts per million of carbon monoxide. As a reference, at levels above 9 parts per million, carbon monoxide begins to affect health. At 35 parts per million, it becomes toxic. These are based on 8 hour exposure cycles, about the amount of time you spend (hopefully) sleeping.
There are a couple of things that you can do to protect yourself. First, have the furnace serviced on a regular basis and make sure you specify that the heat exchanger is inspected for cracks. While you would think that it would be routine, my experience in this area is that it isn't.
Second, install carbon monoxide detectors. They are relatively inexpensive. In older homes, it is perfectly acceptable to use either the plug-in type or ceiling mounted battery operated detectors. In newer homes in Washington State, they are required to be hard-wired into the home.
A special note for people selling homes in Washington State - you are legally required to furnish the home with detectors when you sell your home. This applies even if you are doing it as a for-sale-by-owner (FSBO).
If you are a buyer, I strongly recommend asking the inspector if he uses a carbon monoxide detector during his inspection. They're not foolproof - even if I get acceptable readings on mine, I'll request the heat exchanger be checked by an HVAC specialist - but they are very useful. A good inspector should have one.
Finally, what can be done about cracked heat exchangers? Replacement of the furnace, generally. That's the part that is expensive. It beats being one of the 500 people who die every year from CO poisoning, though.
Blower Door Safety Switch
First, let me explain what a blower door safety switch is.
Your furnace is equipped with a plethora of safety devices - flame rollout sensors, flame sensors (not the same thing despite a similarity in name), limit switches, serviceman's switch - all designed to increase your safety. The blower door safety switch is a simple plunger that, when opened, cuts the power to your gas-fired furnace. Look to the right and you can see what they look like. Depending on the age of your furnace, you probably have one of these. The top one is for a Carrier, the bottom on is for a Ruud (I think).
If you have something 40 years old like a Lennox G8-100, forget it - the switch hasn't been around that long. However, some older models can be retrofitted. The switches are about $30-$50 - it's something to consider but the worst an inspector would be able to say about a lack of the switch is that the unit met the standards for safety at the time of construction but standards have changed and improved with the intervening years.
The purpose of the switch is to prevent your furnace from pulling toxic gases into your home. When the blower runs, it creates a powerful negative pressure zone (to test it, try removing the blower door cover with the unit running - it is much more difficult to do as the blower tries to suck the cover back on.) If you have a leak on the unit releasing carbon monoxide or especially if the furnace is located in the garage, the blower door needs to be tight to the unit to keep the gases from entering the home.
The Most Common Defect with a Blower Door Safety Switch?
Human error in the form of the service technician. The switches are reliable and usually require no maintenance to function properly. But the switch poses a problem for the HVAC tech who is working on the system. The blower compartment usually houses the motherboard for the furnace. To do any work on the board or the associated electronics in the compartment, the door needs to be removed. The system shuts down, precisely as intended.
Except the tech needs it running to perform his diagnostics. So, he tapes the switch closed and gets to work. When he finishes, he puts the cover back on, gives you the bill, and leaves. Forgotten is the piece of tape over the switch. The safety d evice is no longer functioning as intended due to predictable human error. I see this about two dozen times every year, making it relatively common.
This is not meant to bash the techs. Especially since I have called more agents than I can count to ask to be let back into a home where I've managed to leave behind a tool. At one point or another, everything single tool has been forgotten, so I get it.
It also strikes me as silly to write this up as a defect and have a HVAC technician return to fix it. A service call at $60-$100 to remove tape? Nope.
I remove the tape. I'm not supposed to - it's outside my standards of practice and puts the liability on me. I calculate it to be an acceptable risk and a nice deed for the day.
I also check to make sure that the furnace is working before I leave. If it isn't, that little piece of tape goes right back on and the whole thing gets written up.
Gas Log Fireplace Maintenance
The next time you snuggle up near the warmth of a gas fireplace, ask yourself when the last time you had someone do maintenance on it. Usually ignored, gas log fireplace maintenance should be done annually just as you do with your furnace. Right, the furnace is do, too, but that's a different post.
Regular Cleaning
Most of the manufacturers of gas log fireplaces and inserts recommend having the system serviced on an annual basis. Most of this you can accomplish on your own if you are reasonably handy. Always remember to turn off the pilot and the gas to the fireplace before working on it.
Use a brush to clean the control space and the burner once you have the unit opened up. Use a very soft bristle brush to clean the logs - they tend to be fragile, so handle with some care.
Some logs, called 'yellow flame logs', require more frequent maintenance. They don't generate as much heat as the blue flamed logs but present an attractive appearance that rivals a traditional wood fire. The yellow color of the flame is a result of the carbon in the logs and, like the wood-burning fireplace, generates soot. Chimneys for these require the same maintenance as the traditional chimney.
The glass can be cleaned with a standard glass cleaner. Be careful with trim work and clean only with a damp rag - using chemicals might etch the finishes and ruin the appearance of the fireplace.
The Vent
Before you start the fireplace for the first time, check to make sure that the vent is clear of debris and dead animals. Also verify that there are no cracks or holes in the flue pipes. Check for condensation the first time you ignite the fireplace. There will be a little bit but it should burn off quickly. If it doesn't, the condensation may combine with the combustion gases and make a weak corrosive solution that can attack the metal of the flue.
Call the Pros!
The manufacturer also recommends annual service of the gas log fireplace by trained professionals. You really do need to have them come out to service the system. While you can clean and maintain the burner components and do a routine inspection of the vents, the pros can check the fuel/air mixture to make sure that the fireplace operates at optimum efficiency, check for gas leaks, and inspect the blower components to ensure the fan operates correctly.
A reminder - if you smell gas, call a service person immediately and describe to them the type and strength of the odor. Follow their instructions - if they say get out - Get Out!
A second reminder - install a carbon monoxide detector even if everything else in your house is electric. Any home with a gas-fired or wood-burning fireplace or furnace should have one.
So, the basics of gas log fireplace maintenance. Do it and enjoy the ambience all winter, worry-free.

Washington State License #215
Former SBCC Member, Former Chairman State Home Inspector Advisory Licensing Board.